Thank you very much to purchase a premium theme of us. Feel Free to contact with us for any issue. You can write us here: support@codexcoder.com
Yooga
A Beautiful, Professional Yooga clean, modern, user friendly, fast-loading, customizable, flexible, and functional WordPress theme.
- By: CodexCoder
- Email: support@codexcoder.com
A Beautiful, Professional Yooga clean, modern, user friendly, fast-loading, customizable, flexible, and functional WordPress theme. It uses the best clean SEO practices, overall ití»s fast, simple, and easy to use. We offer a strong support and friendly help 24/7.
Before you start playing around with this Premium Theme, let's check what you've downloaded so far:
- Documentation - That's where you
- Sample Data - Demo content and theme setting json for complate setup.
- Upload - This is where all Theme files are (zipped & unzipped format)
The first option how to install Yooga WordPress Theme would be to directly upload the yooga.zip file via WordPress Theme Uploader.
-
Log into your WordPress backend
-
Navigate to Appearance > Themes
-
Click Install Themes/Add Themes
-
Click Upload/Upload Themes
-
Now you just need to find the "yooga.zip" in the Upload folder and hit Install now.
-
After Installed then click Active Now
Theme Install From FTP
The second option how to install this Theme would be the upload via FTP manager. It really dosen't matter which of the two ways you choose, just choose the one you feel more comfortable with.
-
Login to your FTP account and navigate to your WordPress Installation directory
-
Navigate to the folder /wp-content/themes
-
Upload the "Yooga" folder (not the .zip-file). This is the folder located inside the "Upload" folder in the zip-file you've downloaded from CodexCoder.
-
Now log into your WordPress backend
-
Navigate to Appearance > Themes
-
Find the Theme and click Activate
After installing the theme, you can see the notice below screenshot:
Now click on Begin Installing Plugins.

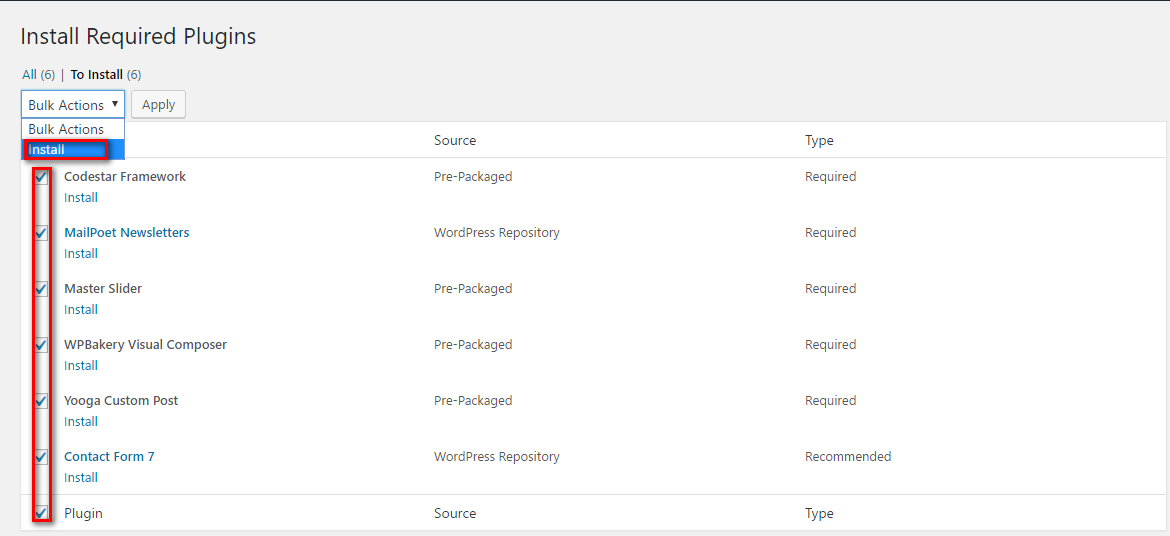
Put tick all the plugins and select the Install and click on Apply.
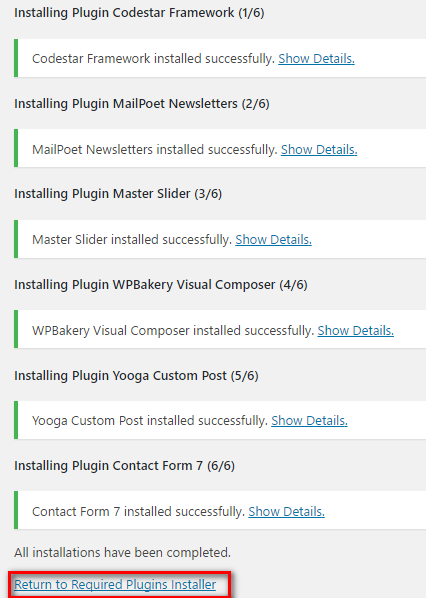
Now you can see the all installed plugins name and their installed message.
Finally, you put tick all plugins and click on Activate option individually or from Bulk Actions
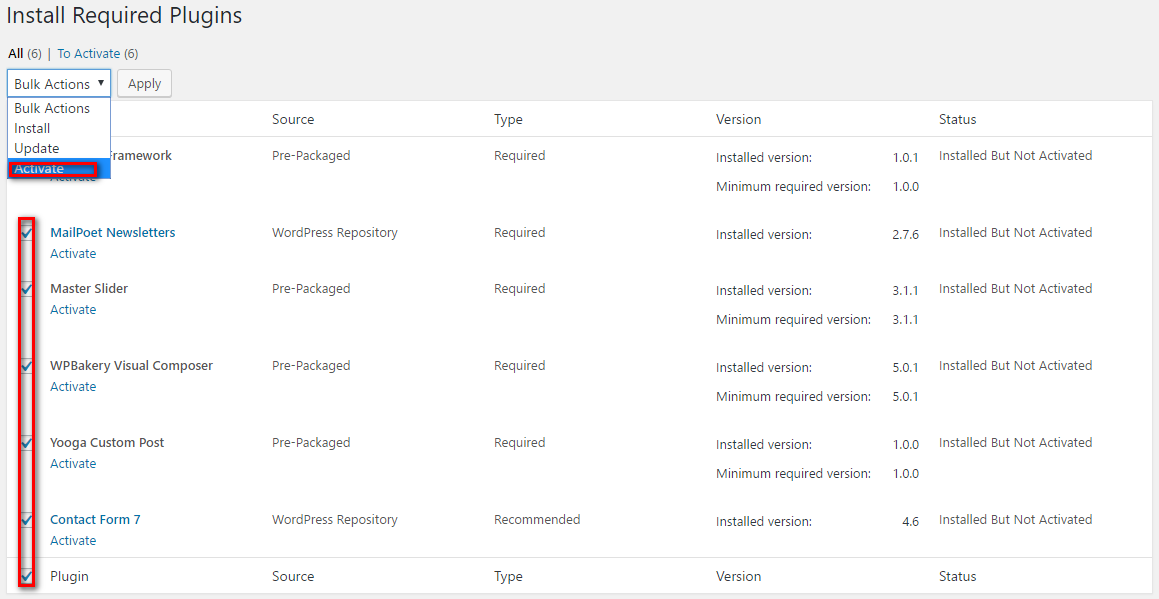
Now you can see the plugins are activated.
The theme comes with a demo package. This package includes posts, pages, comments, settings, image and so on. This demo package is imperative in helping you to learn how the theme works. To import demo Data, you can follow these steps:
- Go to dashboard and click on Tools.
- Click on Import to begin the import process
- Then click on WordPress (Install Now) .
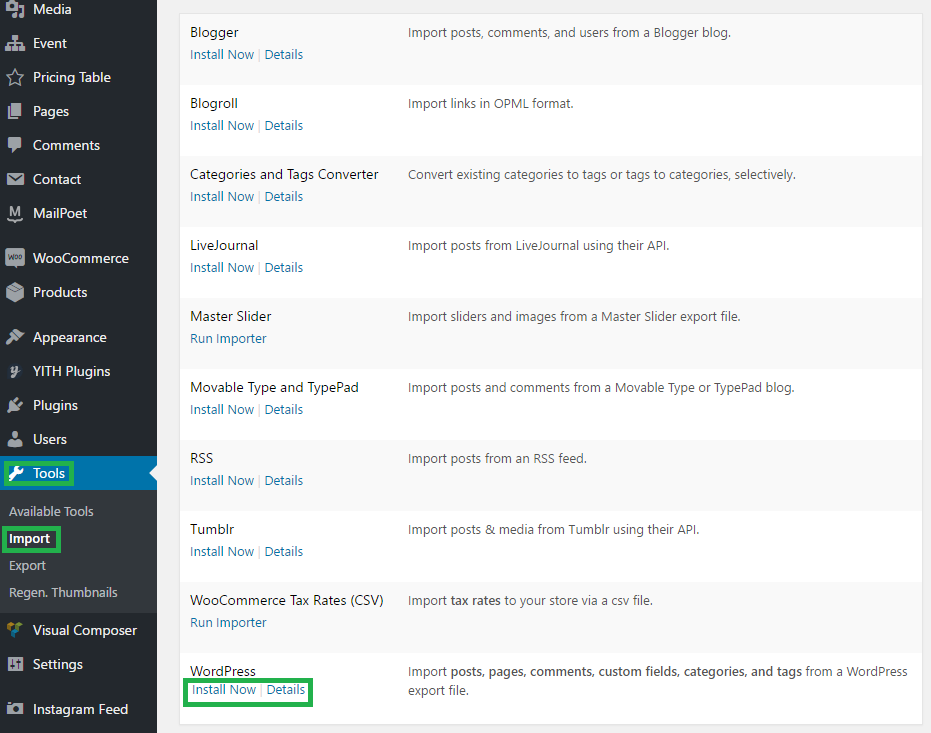
- Now click on Run Importer .

- After clicking on run importer you can able to see the Choose File button. Click on the button and choose your required demo data from Demo Data folder. Choose your expecting demo folder and import xml file.
- Now click on Upload file and import button.

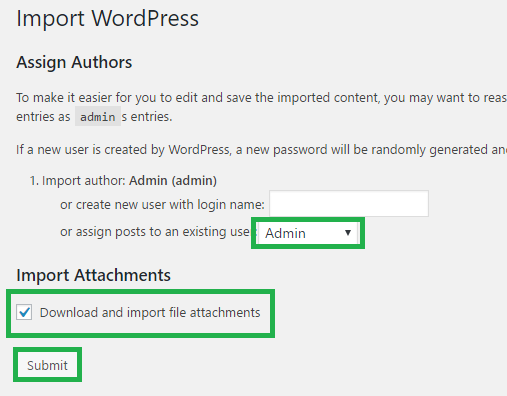
- Now you can see the screenshot below: Now put tick on Import Attachments option.
- And click on Submit button.
- Now you can see the screenshot below: Finally click on Have Fun and go back to your dashboard. Your demo will be imported.

After installating and activating yooga, you need to perform the following tasks to enable landing page.
- Create new page (Pages > Add New) with a title "Home Page" and keep the content blank. Now assign it "Default Front Page" page template from the right side page template dropdown menu. Now save/publish it
- Create another page. Enter "Blog" as title and keep the content field blank. Now save/publish it
- Go to Settings > Reading Menu, From the "Front Page Settings" section, click on static page, and select previously created Home Page and Blog from the dropdowns as shown in the picture below and save.
All of our Themes are able to be translated into any language. The process of translating the theme is a user responsibility. The following instructions are given as guidance.
- Open wp-config.php and replace this:
define ('WPLANG', ''); with this (subsitute the language string (bg_BG) with your own!): define ('WPLANG', 'bg_BG');
- Download and install POEDIT
- Connect to your site -> open your theme/languages directory
- Download the default.po file and open it with POEDIT.
- Translate file and save it as bg_BG (the file name must match with the string you inserted into wp-config.php)
- Two files will be generated after save. bg_BG.po and bg_BG.mo
- Upload the .mo and .po files into wp-content/themes/your-theme/languages folder
Your WordPress installation should be in the language you intend on using the site.
Important info, regarding translation in WordPress.
- Go to (WordPress Dashboard > Settings > General)
- Select your website langauge as shown in this screenshot:

For your primary menu first go to dashboard
- Click on Appearence
- Click on Menus
- Click on create a new menu(Primary Menu)
- Write your menu name. Example: Main Menu.
- Click on Create Menu.

6. Select menu's element from Pages or Custom Links. (Put tick)
7. Click on Add to Menu button.
8. Now decorate your menu drugging up and down by cursor.
9. Put tick in Menu Left/ Menu Right.
10. Click on Save Menu.

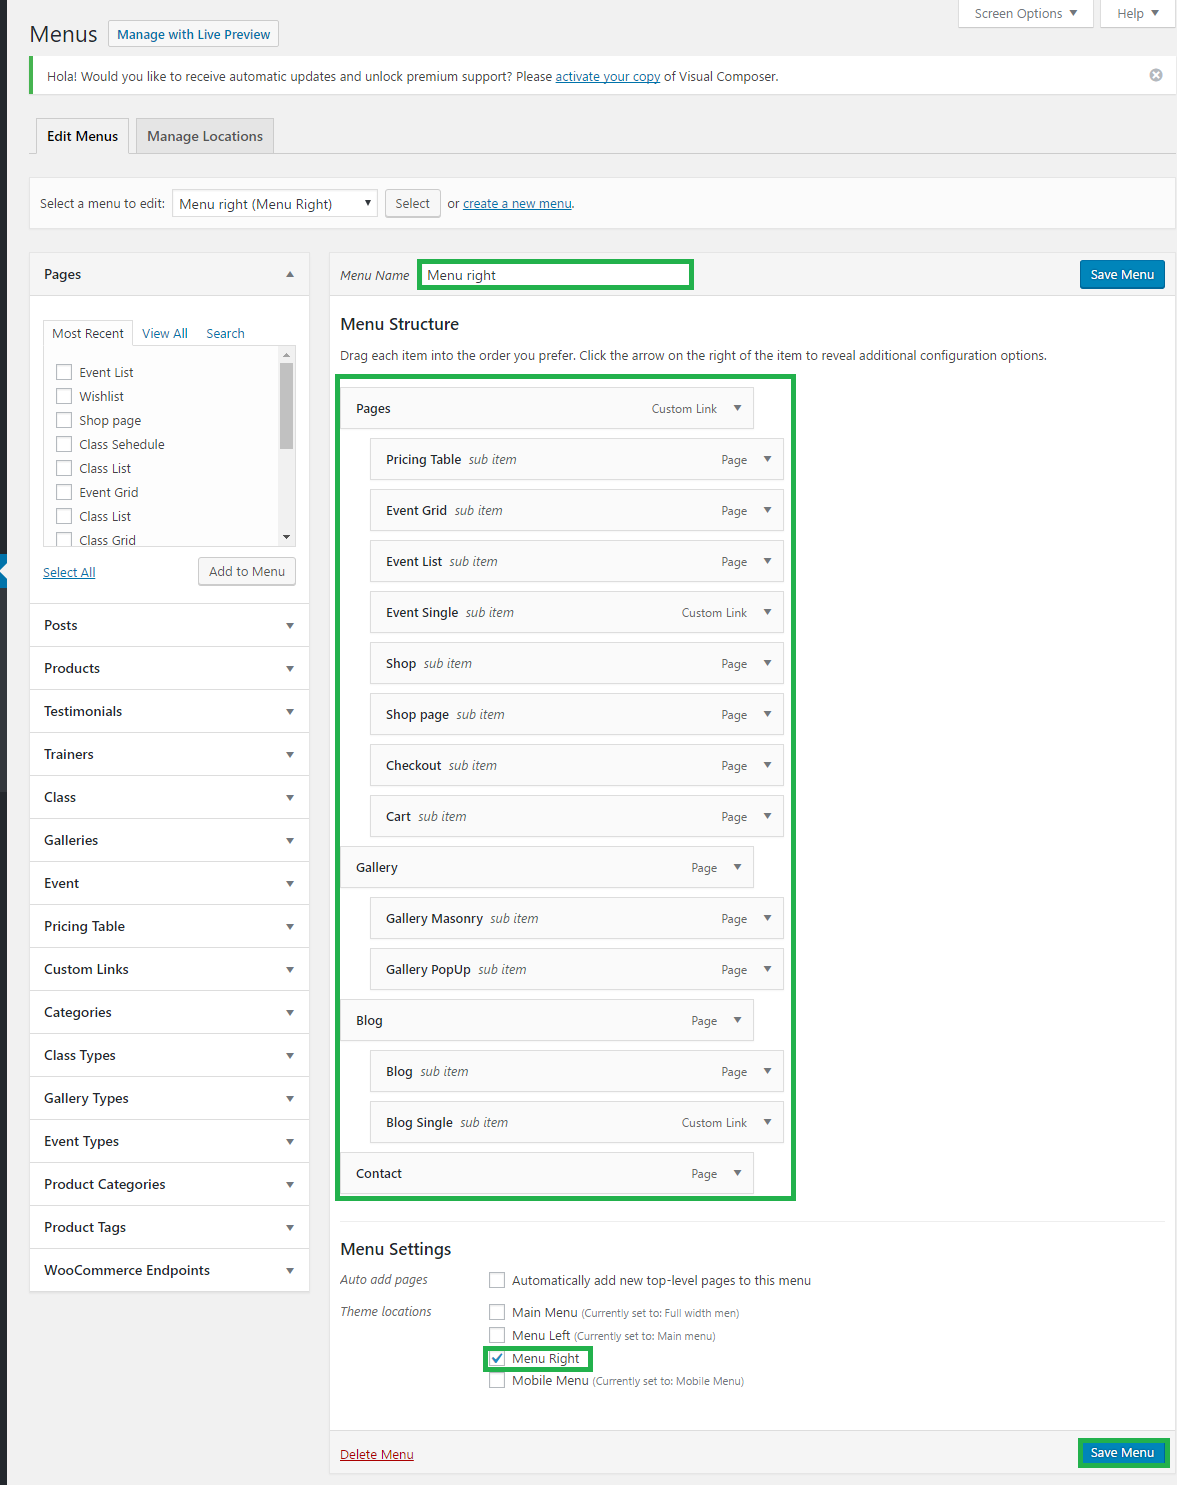
Now you can see the outlook of your selected menu.

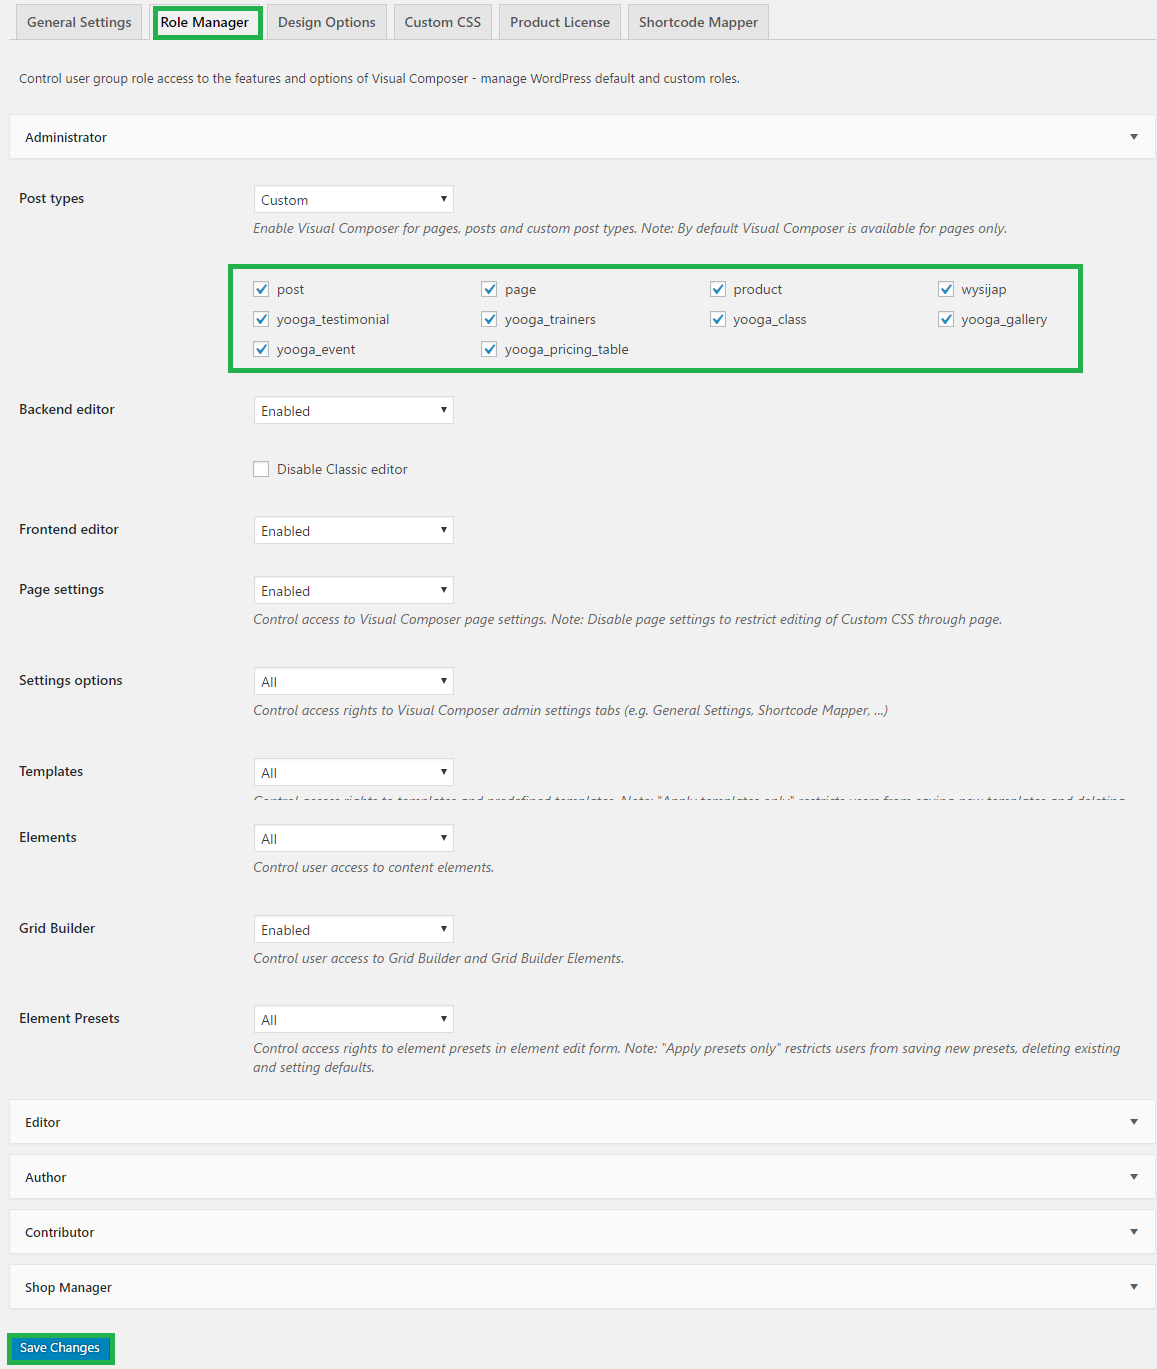
At first you need to go dashboard and click on visual composer > role manager > select the checkbox for post, page, product, yooga_testimonial, yooga_trainers, yooga_class, yooga_gallery, yooga_event and yooga_pricing_table. Then click on Save Changes .
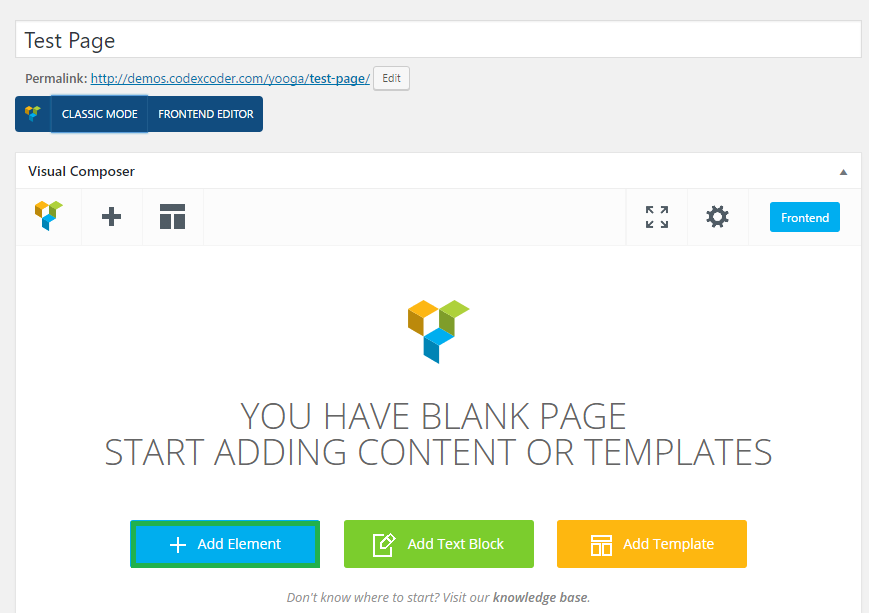
1. Click on pages > 2. Click on Add New > 3. Put the title of your page. > 4. Click on visual composer BACKEND EDITOR
Now click on + Add Element .
Then click on Yooga .
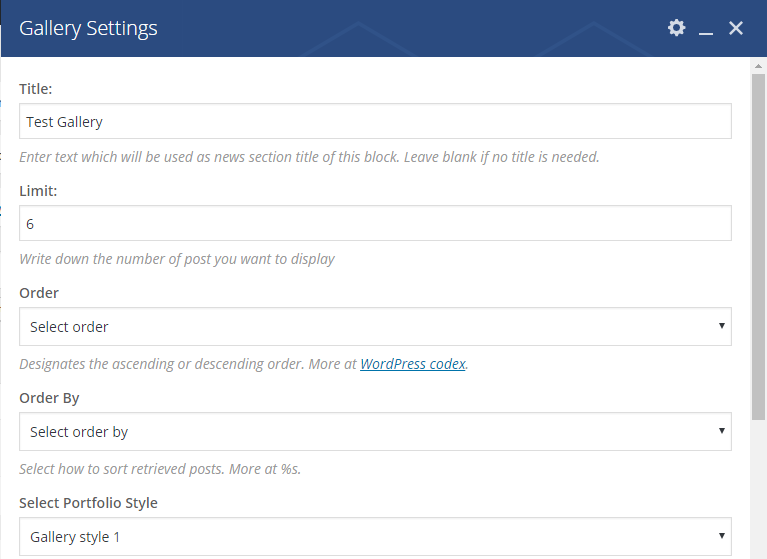
And choose an element. Example: Gallery .

Write a title into Title options.
Mention here your gallery limit into Limit options.
Order your gallery from Order options.
Order By your gallery from Order By options.
Select your gallery style from Select Portfolio Style options.
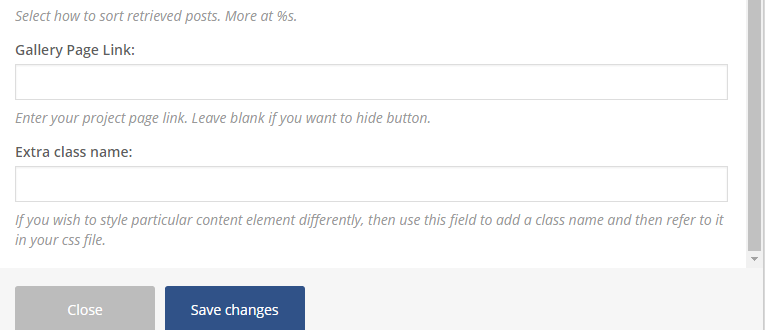
You can put here your gallery page link into Gallery Page Link options.
You can also use here an extra class from Extra Class Name options.
Finally click on Save Changes options.
Now click on Publish button.
At last, you can see the outlook looks below:
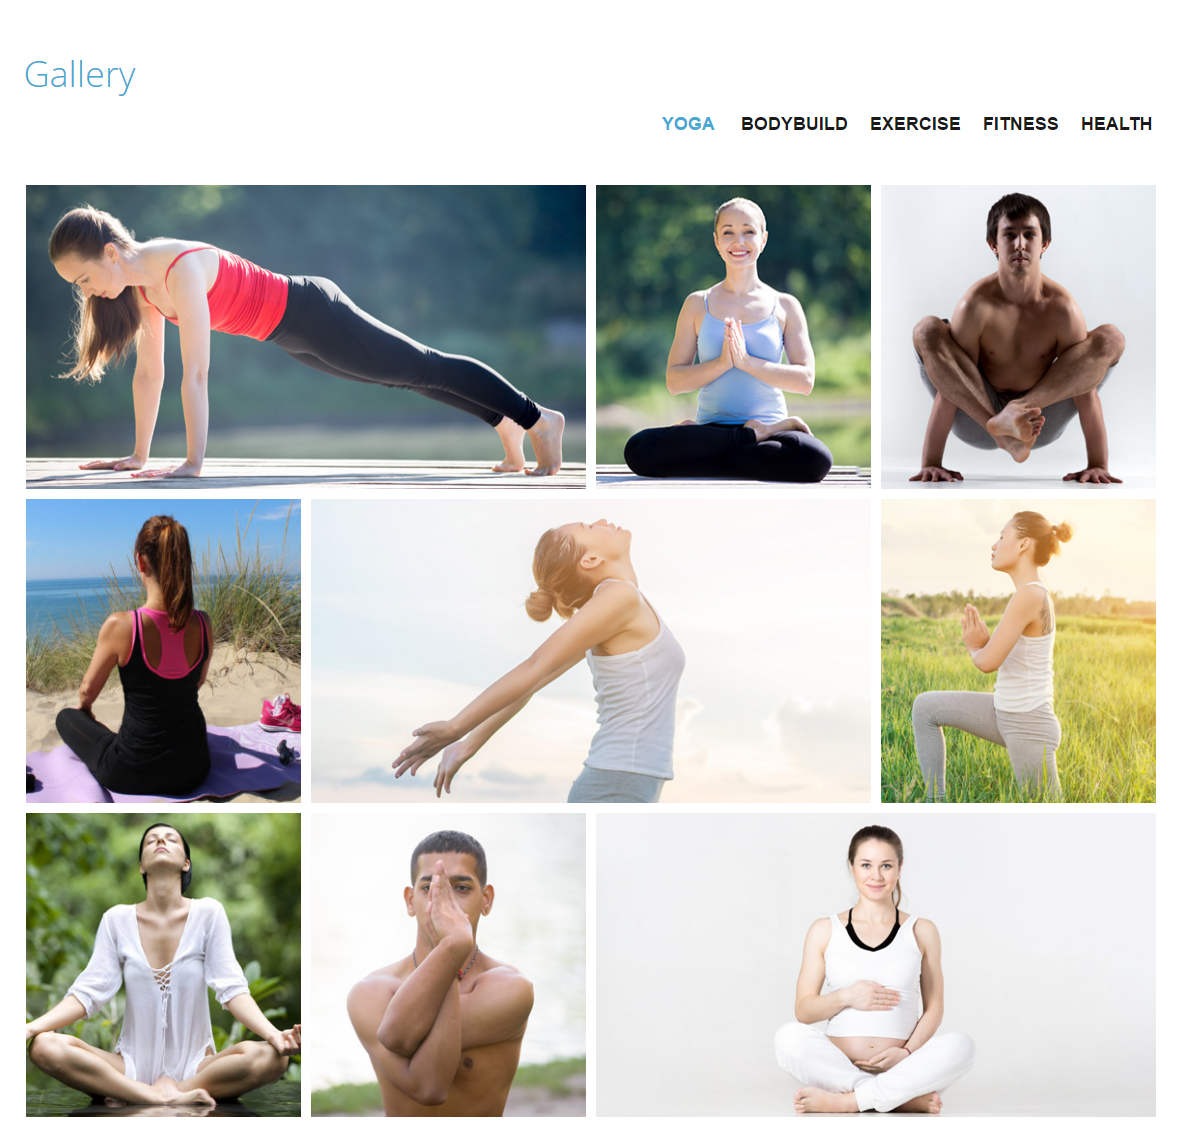
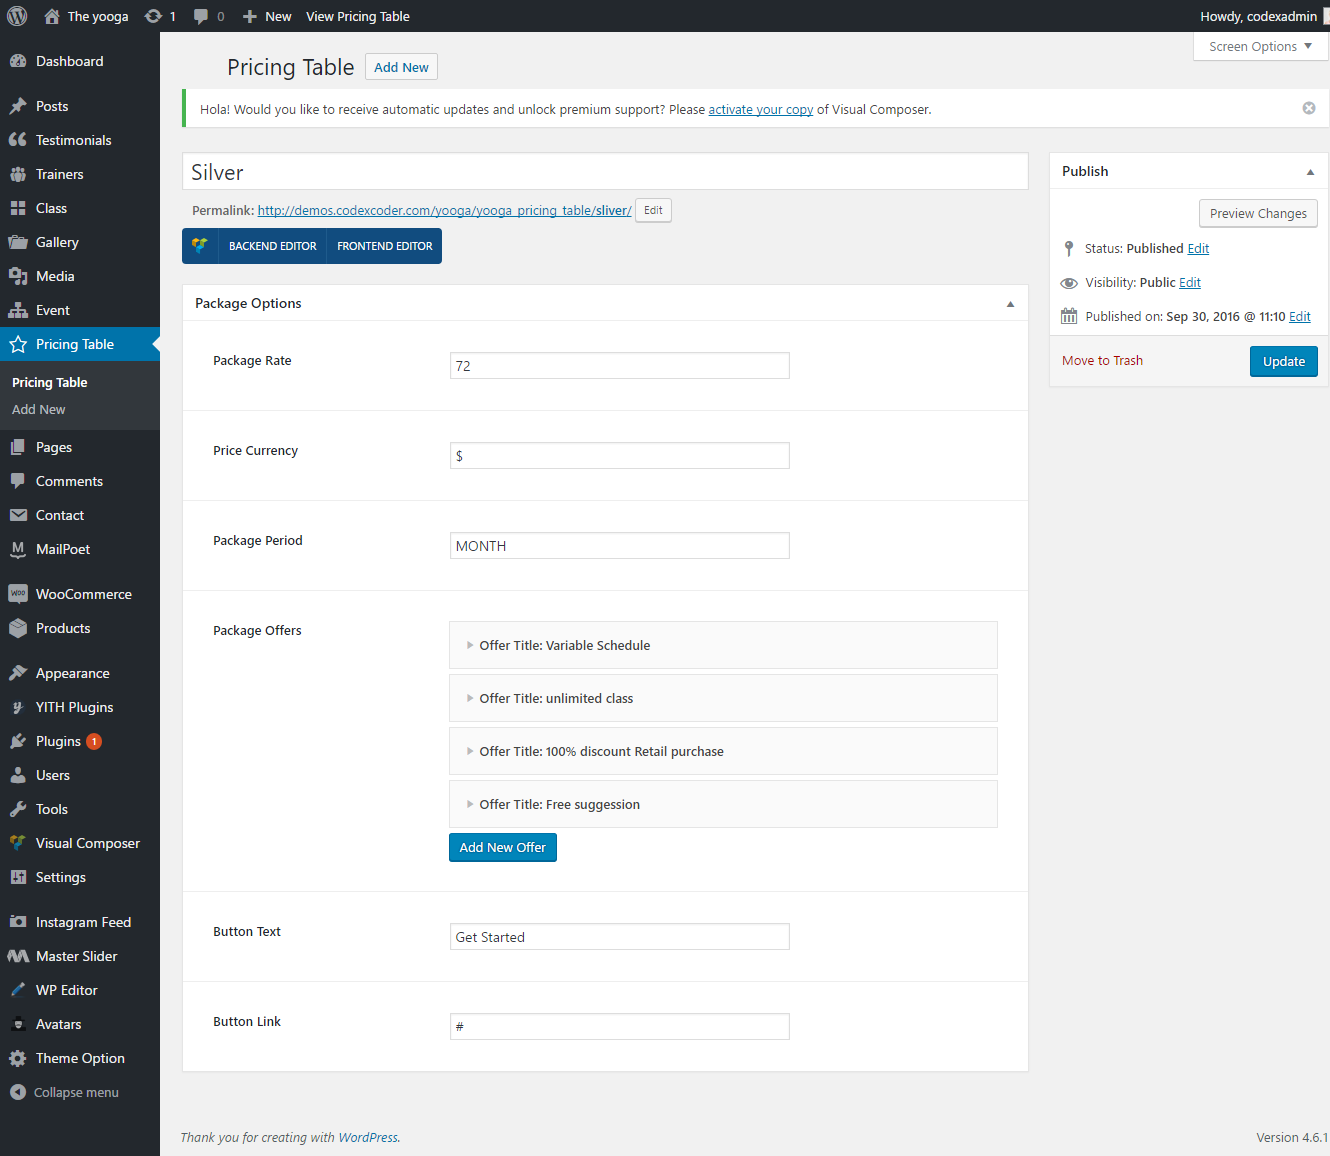
1. Go to Dashboard and click on custom post typePricing > 2. Click on Add New >
3. Write the pricing table's title into Title field.
4. Then in the Package Options field you can see the some option to add details about your pricing table.
5. At first put your expecting price amount into Package Rate option.
6. Put your choicing currency into Price Currency option.
7. Now mention here the duration of time into Package Period option.
8. Now add here your package offers using Package Offers option.
9. Put your button text into Button Text option.
10. Now put your button link into Button Link option.
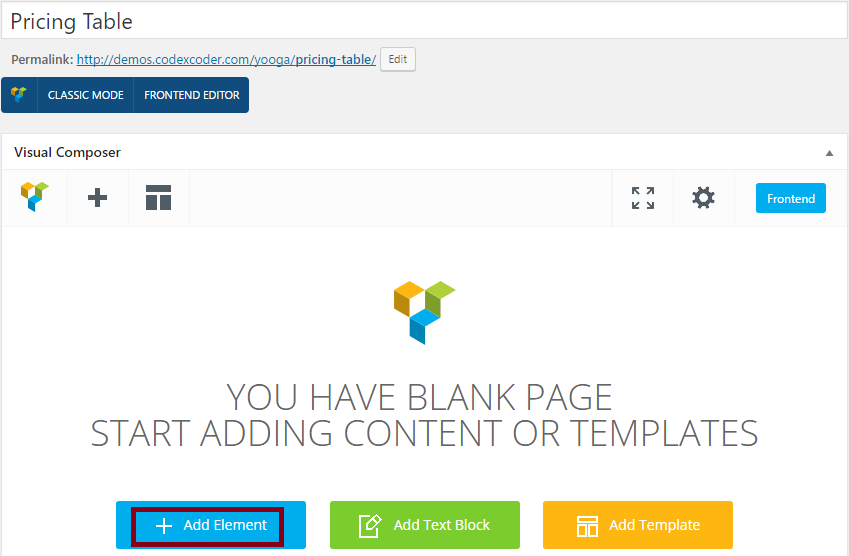
1. Then click on Pages 2. Click on Add New and put the page name example: Pricing Table.
3. Click on Add Element .
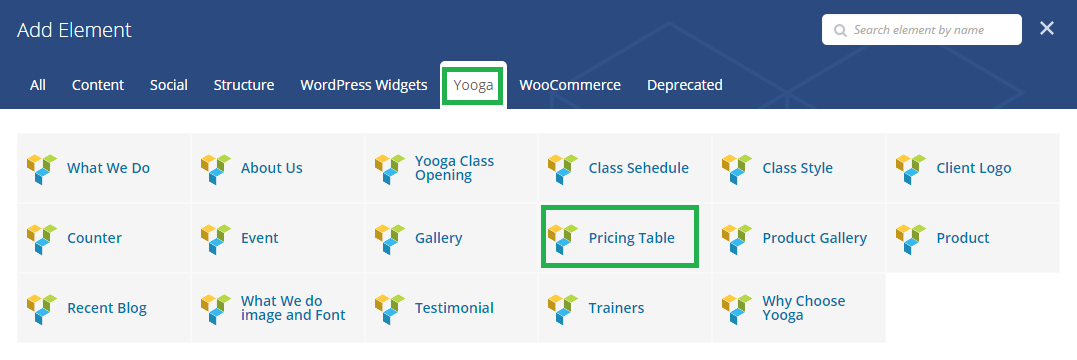
4. Now click on Yooga and choose a short-code example: Pricing Table .
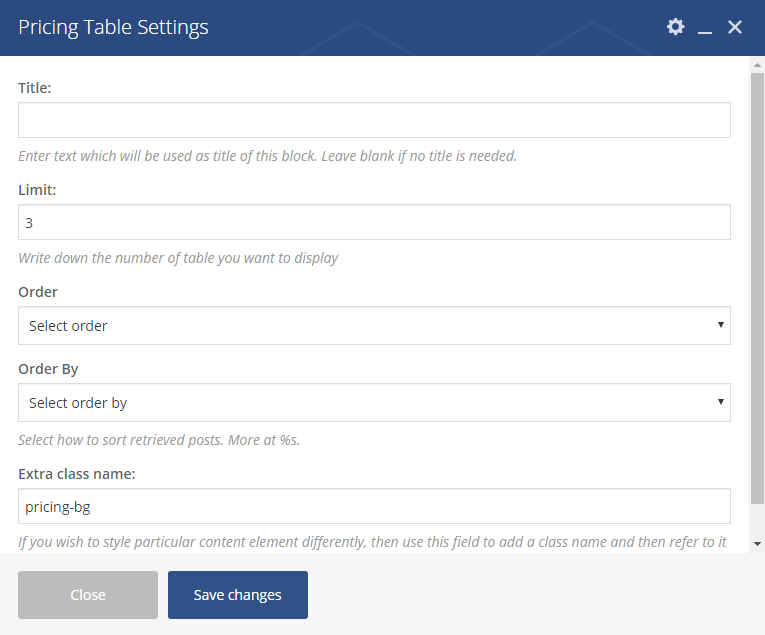
5. If you want to put a title, you can put a title into Title field .
6. You can also mention here the pricing limit from Limit option .
7. Without this there are two more option to ordering your pricing.
8. Here you can able to put an extra class name to put a background image using pricing-bg class.
9. Finally click on Save Changes button.
Now click on Publish button.
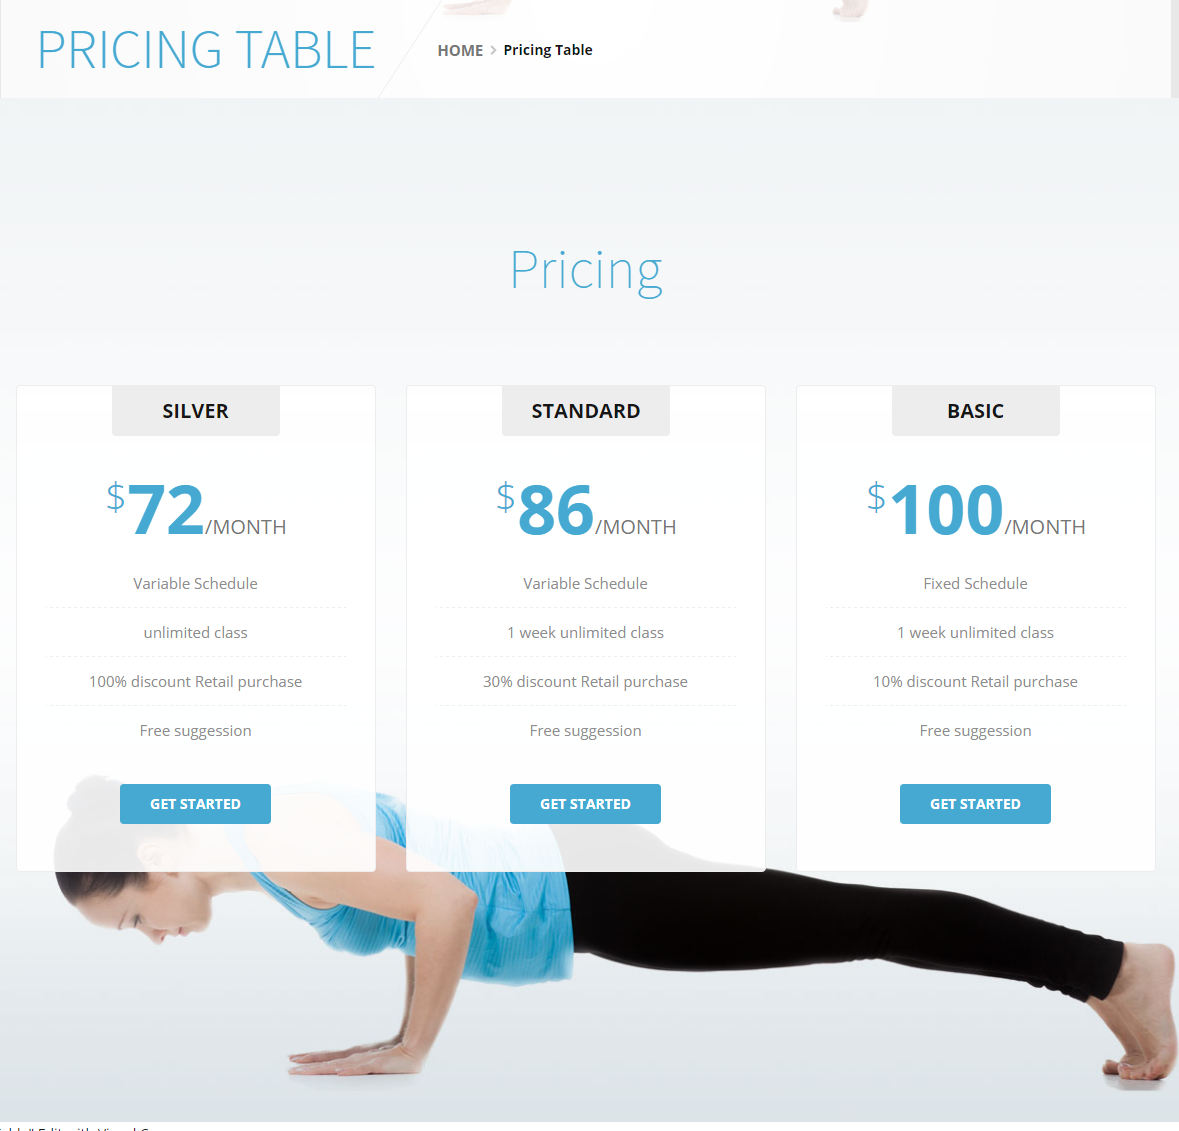
At last, you can see the outlook looks below:
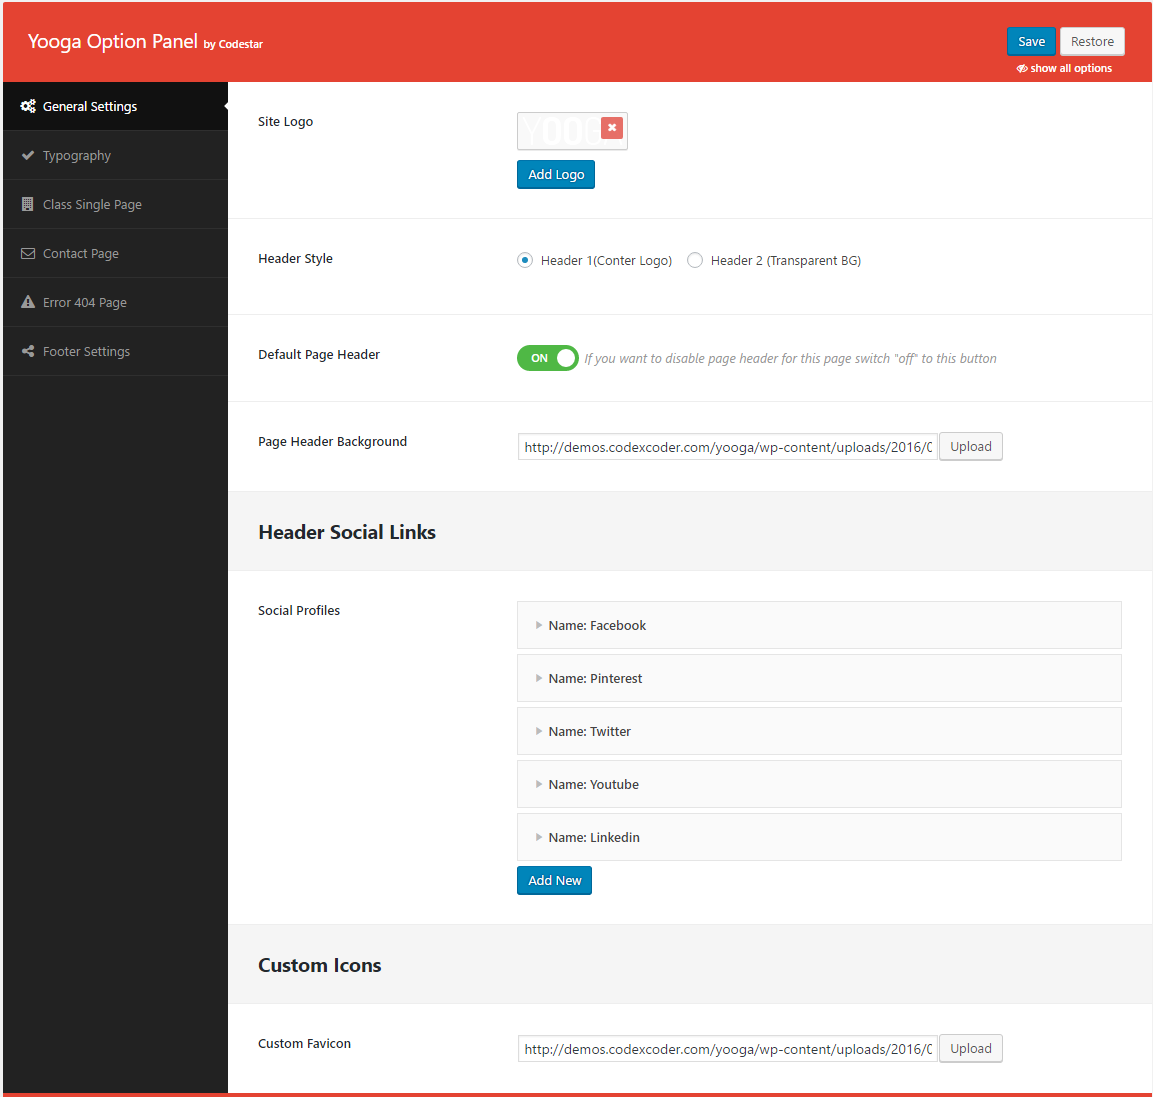
If you want to change the general options of the theme, go to your WordPress Admin Area to EventTerm Setup menu. Here you have a tabbed Navigation where you can change a lot of Options of your new Theme. There have lot's of option for EventTerm Theme.
- General Settings
- Typography
- Class Single Page
- Contact Page
- 404 Page
- Footer Settings
Notice: Before adjusting the different settings, you should first click on the Save Options button, to insert all default data to the database and make sure everything looks good.
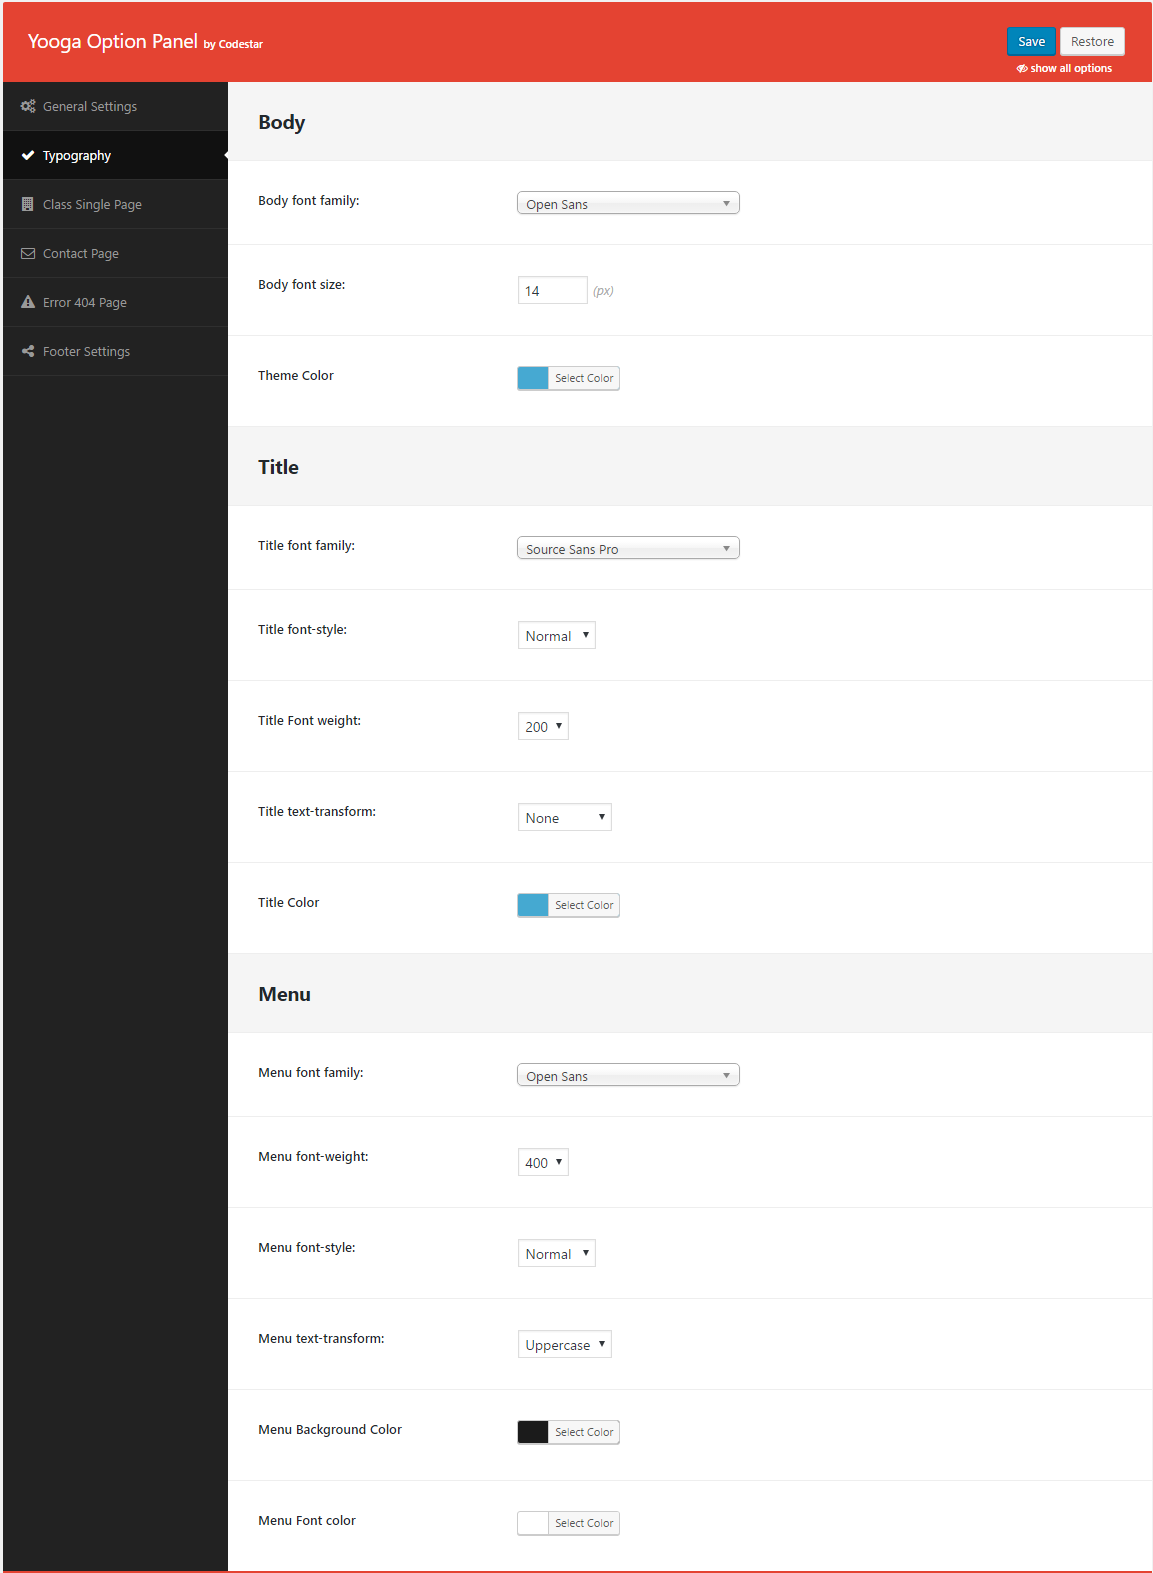
Go to Theme Option > Typography.
- Click on Typography
- Body Font Family : Use unlimited google font.
- Body Font Size : Put font size.
- Title font family : Theme all title will take this font family.
- Title font family style : Theme all title will take this font family style.
- Title text-transform : Theme all title will take this text transform.
- Title color : Theme all title will take this color.
- Menu font family : Menu will take this font family.
- Menu font weight : Menu will take this font weight.
- Menu font style : Menu will take this font style.
- Menu text-transform : Menu will take this text transform .
- Finally, click on Save button to save.
.
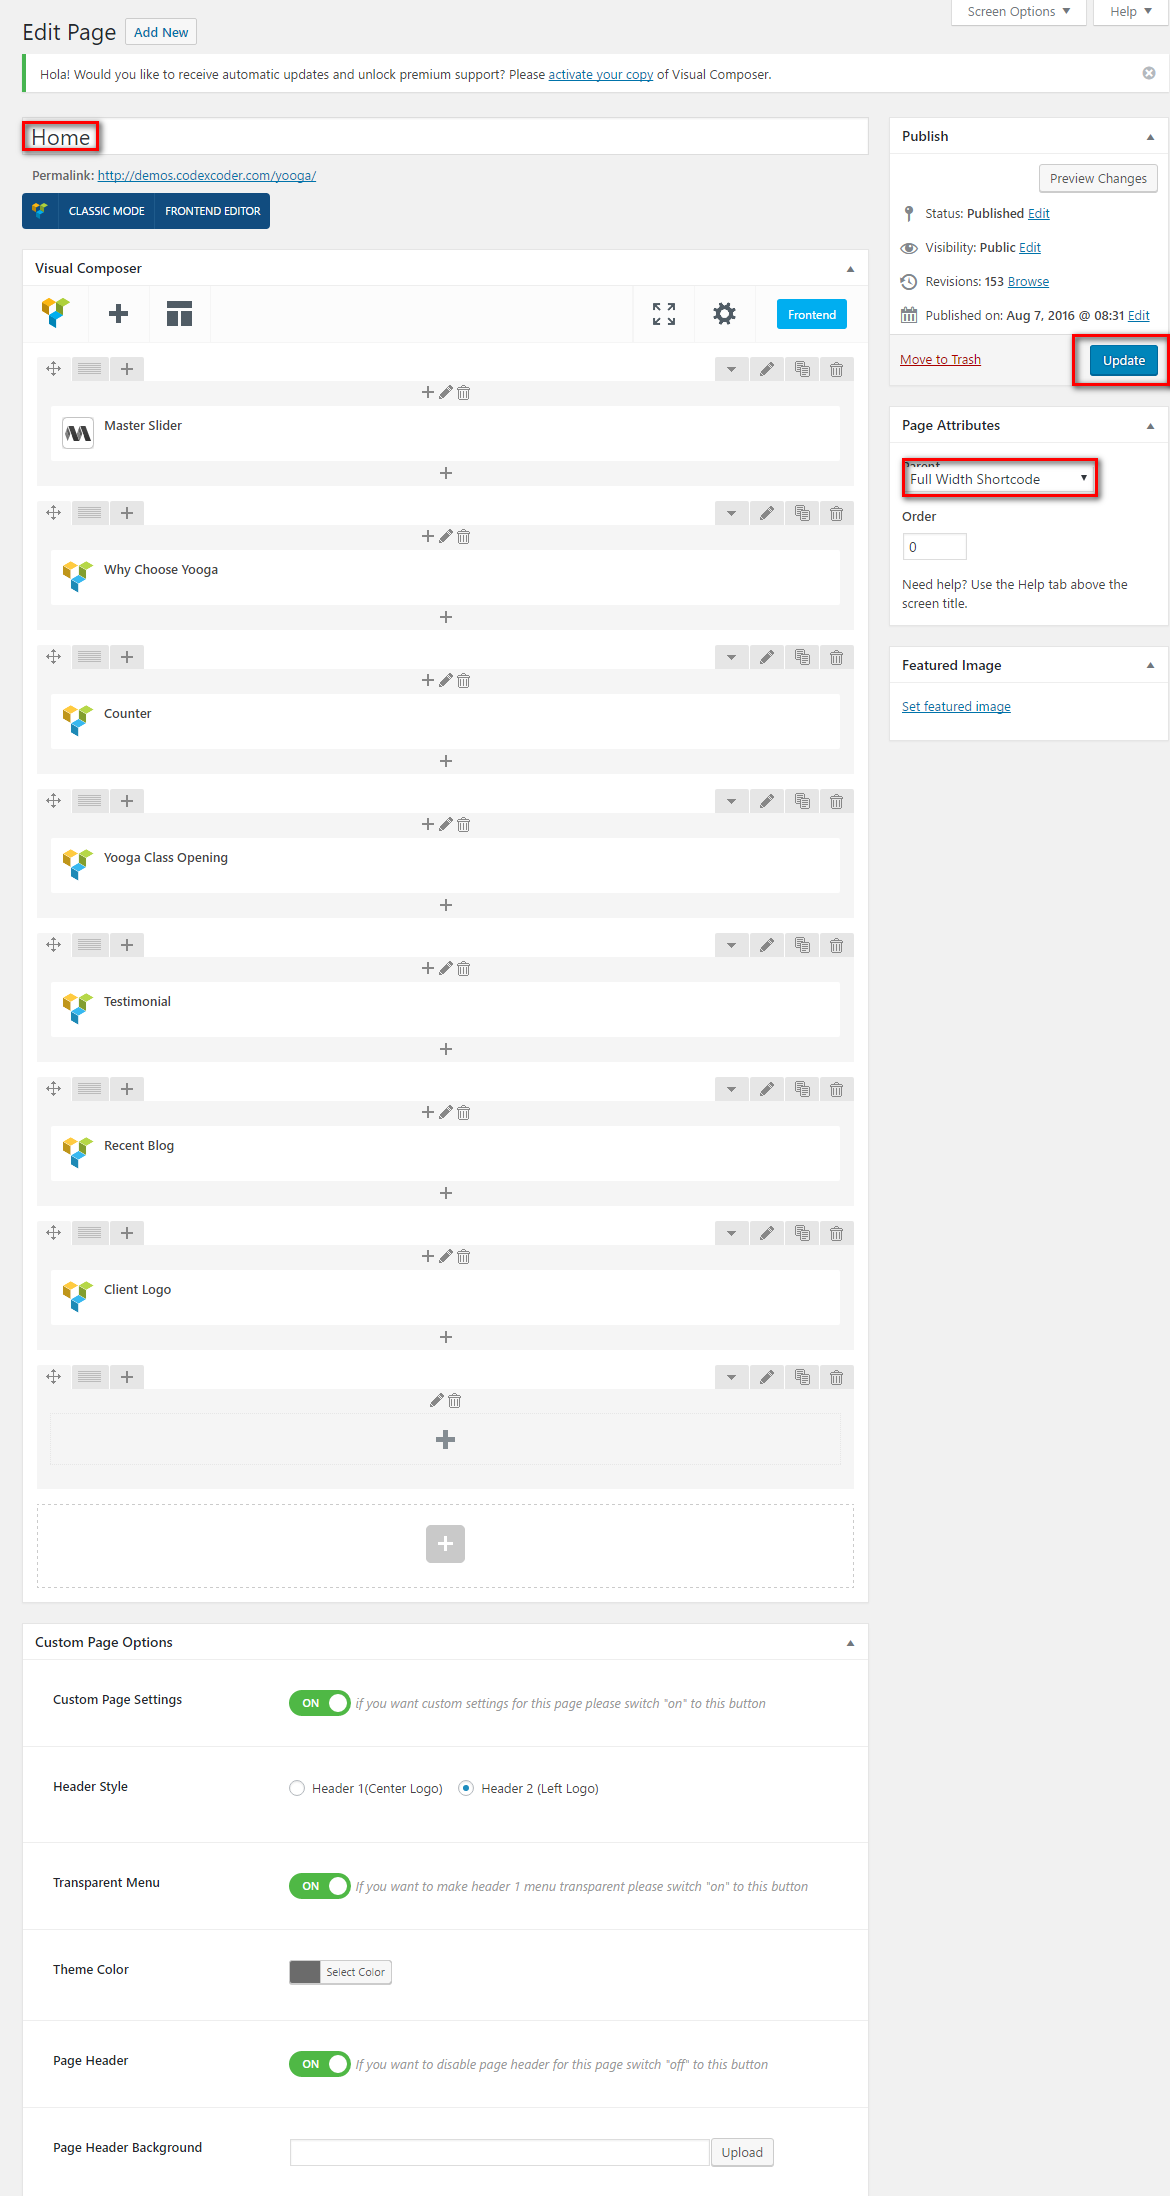
Go to Dashboard > Pages > Add New.
- Pu a title from Title field.
- Then use visual composer short code to decorate your homepage.
- Use the switch of Custom Page Settings option for open or close the custom page settins.
- Choose the header style using Header Style option.
- Using Transparent Menu option you can able to transparent the menu's background color. As well as using Theme Color option, you can able to choose the background color of your menu.
- Then using Page Header option's switch, you can able to on/off the page header.
.
- Also you can able to show your page header background using Page Header Background option.
- Please select the Full WIdth Shortcode template style from Template option.
- Finally, click on Publish button to publish.
.
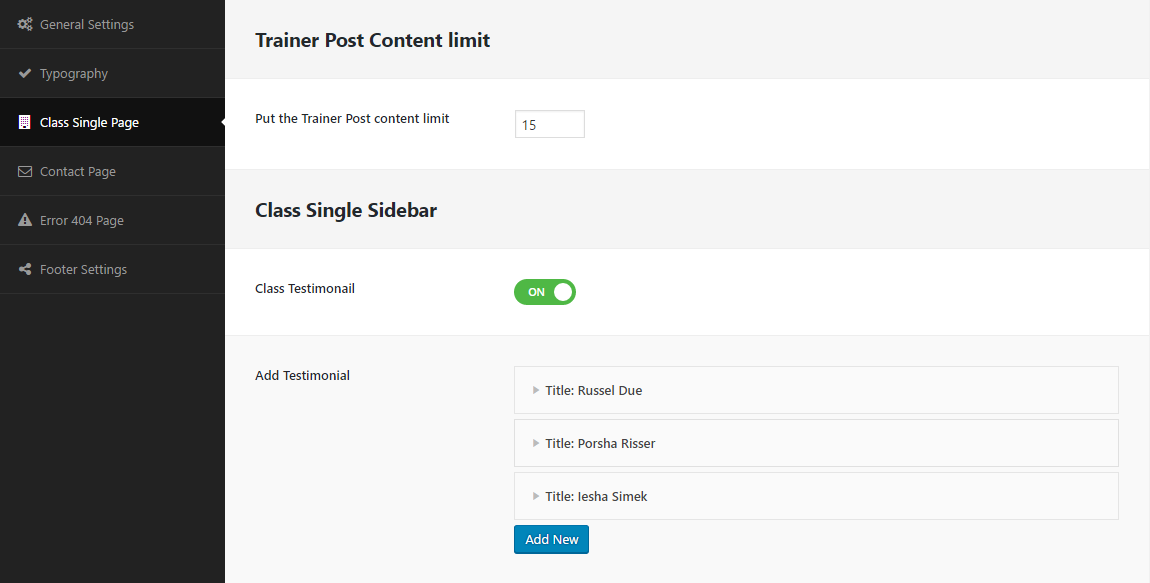
Go to Theme Option > Class Single Page.
- Click on Class Single Page
- You can mention here your trainer sidebar content limit from Trainer Sidebar Content Limit option.
- You can able to on/off your trainer sidebar testimonial from Trainer Sidebar Testimonial option.
- You can also able to add testimonial from Testimonial option. You can also add and remove testimonial from here.
- Finally, click on Save button to save.
.
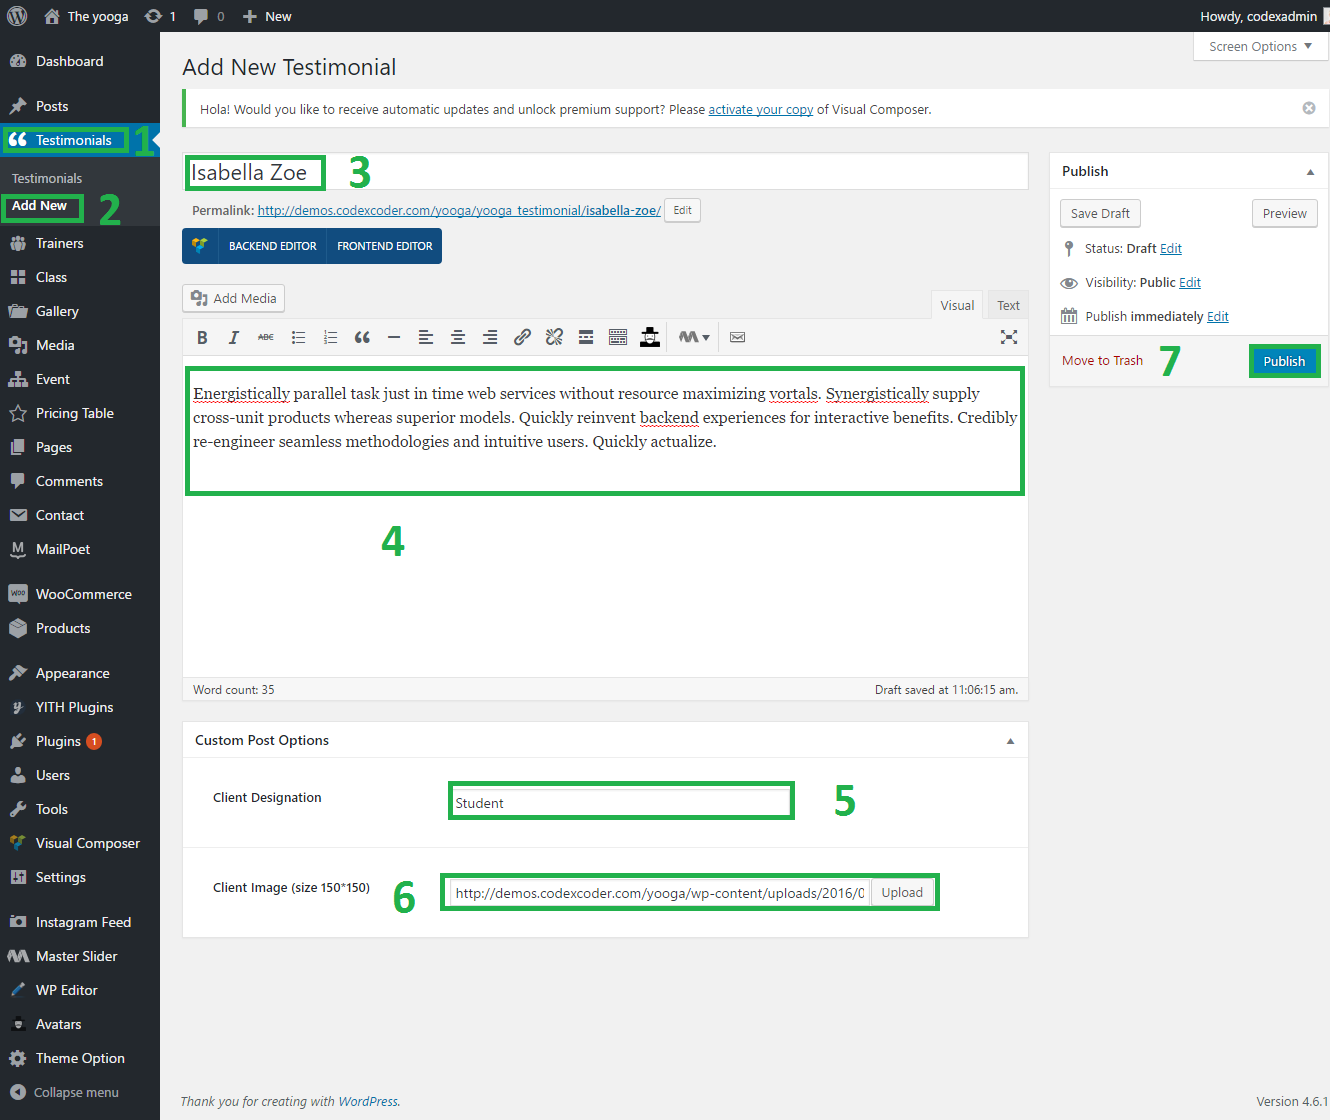
Go to Dashboard.
- At first click on Testimonial
- Now click on Add New
- Now put your client's name into Title field.
- Then put your client's description into Description field.
- Now put your client's designation into Client Designation option.
- As well as put your client's images into Client Image (size 150*150) option.
- Finally click on Publish button.
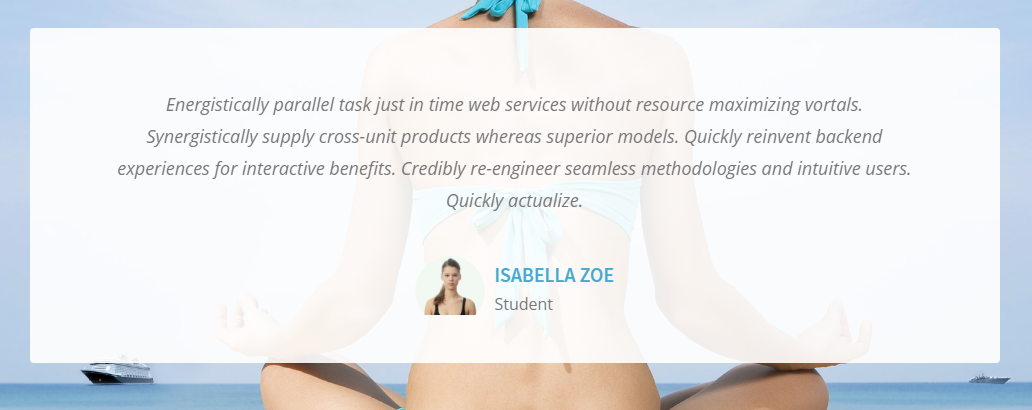
Now you can see the result below:
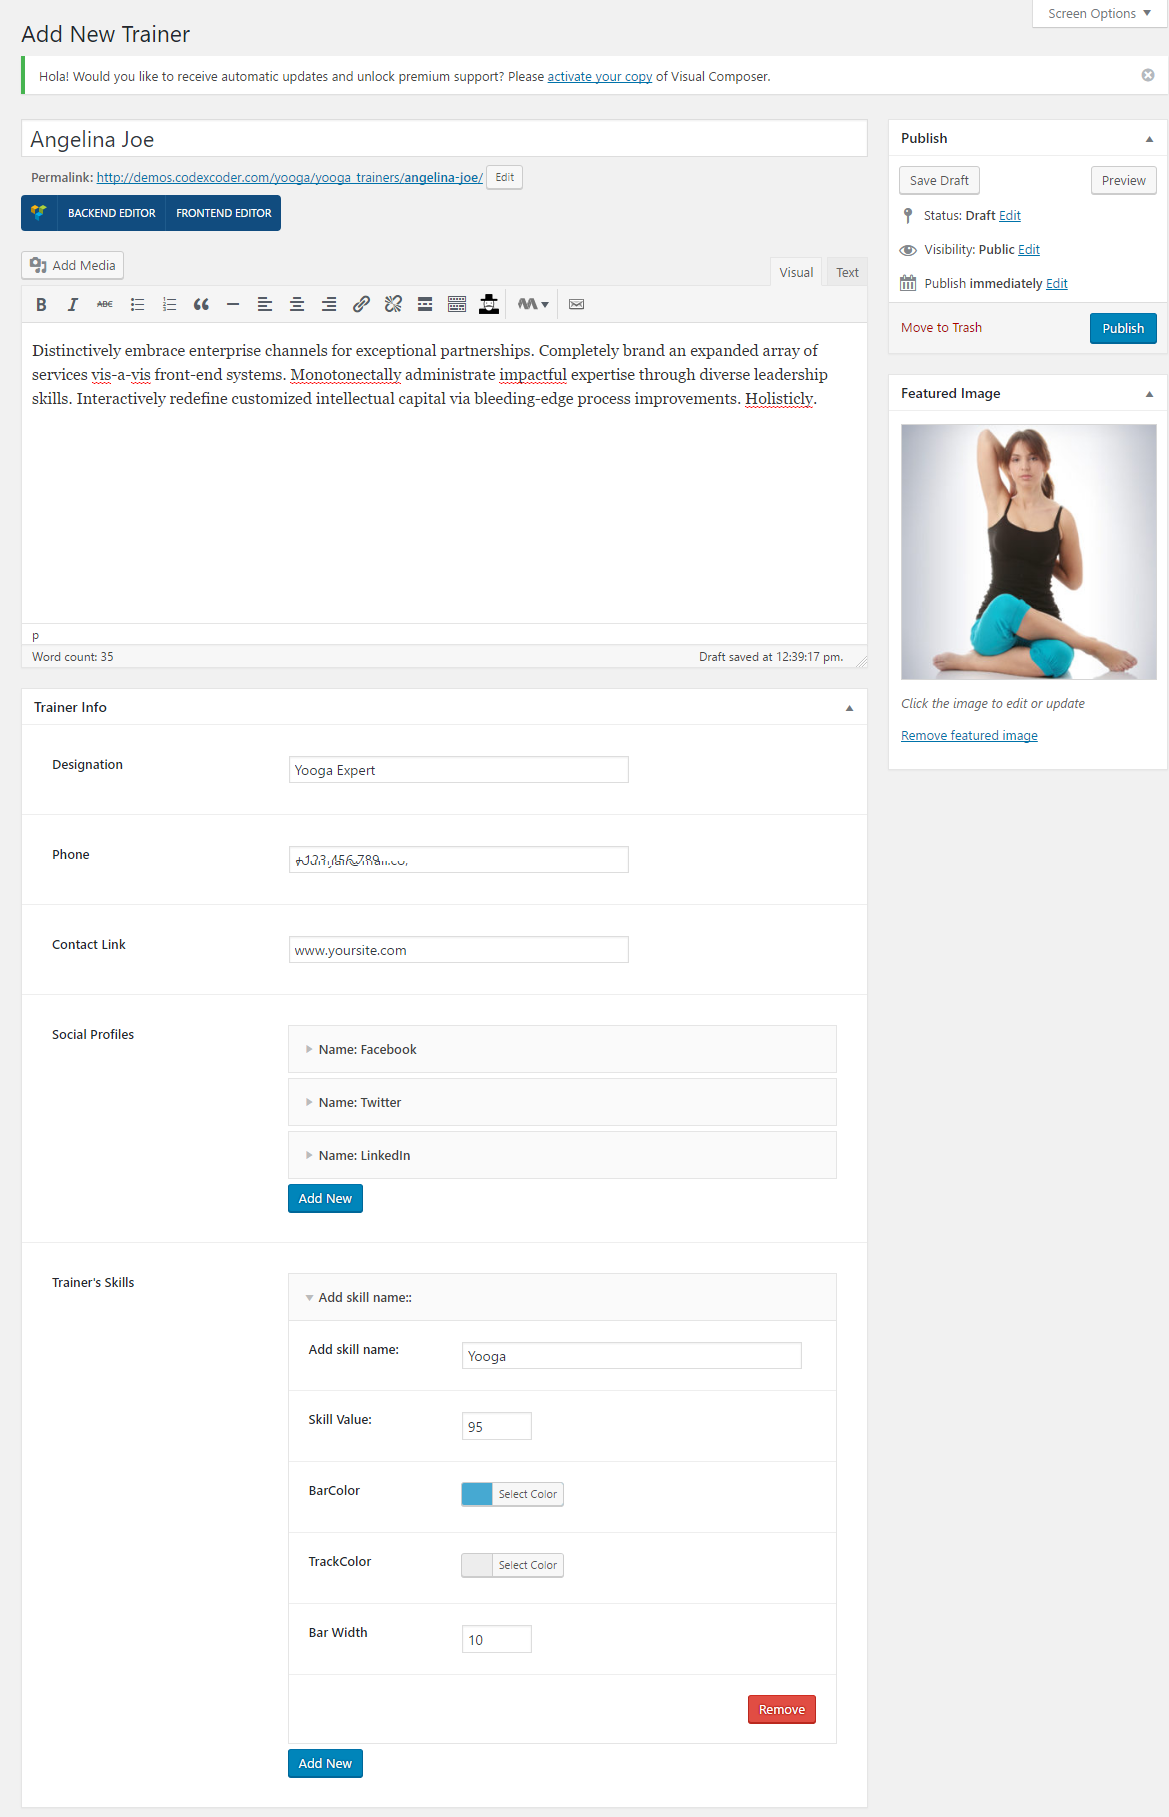
Go to Dashboard.
- At first click on Trainers
- Now click on Add New
- Now put your trainer's name into Title field.
- Then put your trainer's description into Description field.
- Now put your trainer's designation into Client Designation option.
- Then put your phone number into Phone option.
- Put your email id into Eamil option.
- Now you can put your website name into Website option.
- You can also put your own website link into Contact Link option.
- Then you can mention here your social media from Social Profiles option.
- Without this you can show here your expertness or skill from Trainer's Skills option. Here you can able to add new skills name as well as you can remove from this area.
- Now choose a image to show from Featured Image option.
- Finally click on Publish button.
Now you can see the result below:
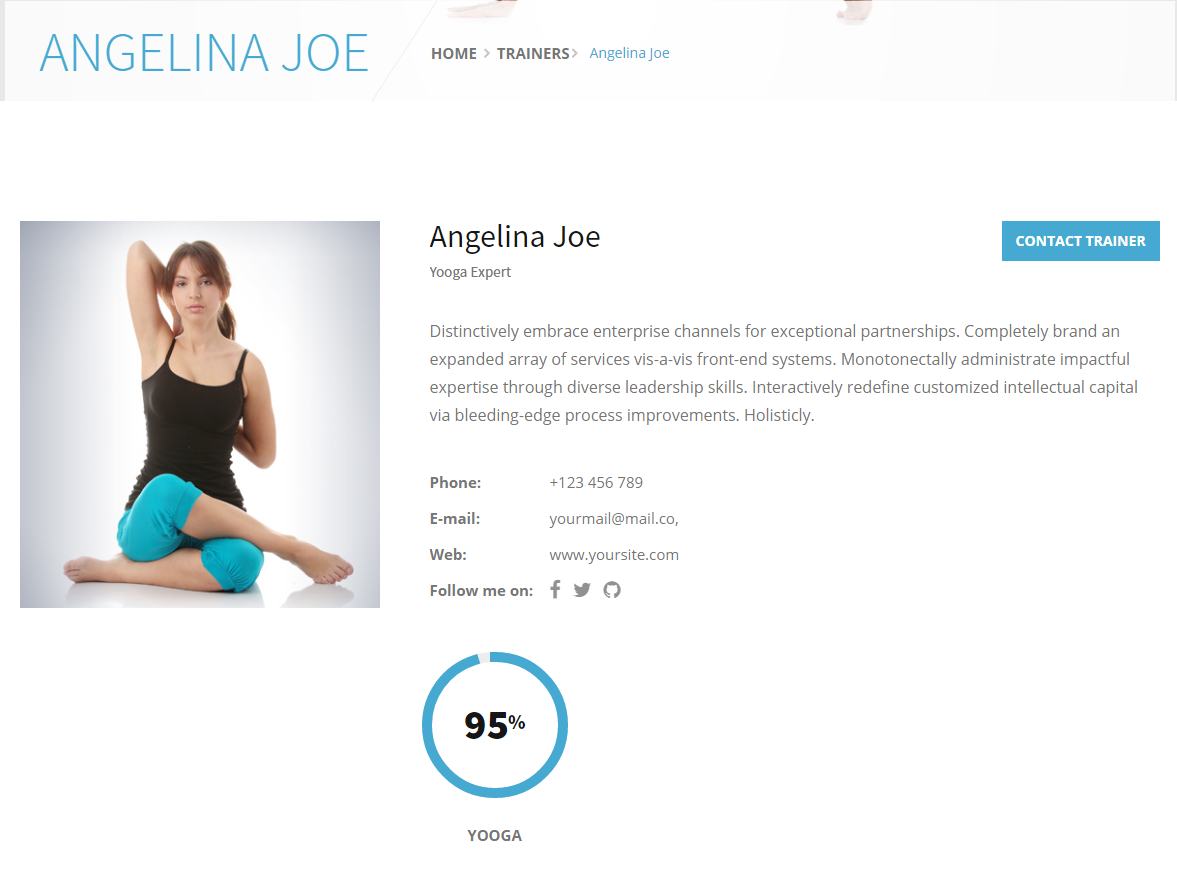
Go to Dashboard.
- At first click on Class
- Now click on Add New
- Now write the class name here into Title field.
- Then put description into Description field.
- Mention here the class date into Class Date option.
- Then put the duration of class into Class Time option.
- Also you can mention here your seat capacity into Number of Seats Capacity option.
- Now you can put your website name into Website option.
- You can also put your own website link into Contact Link option.
- Then you can mention here your social media from Social Profiles option.
- Without this you can show here your expertness or skill from Trainer's Skills option. Here you can able to add new skills name as well as you can remove from this area.
- Now choose a image to show from Featured Image option.
- Finally click on Publish button.
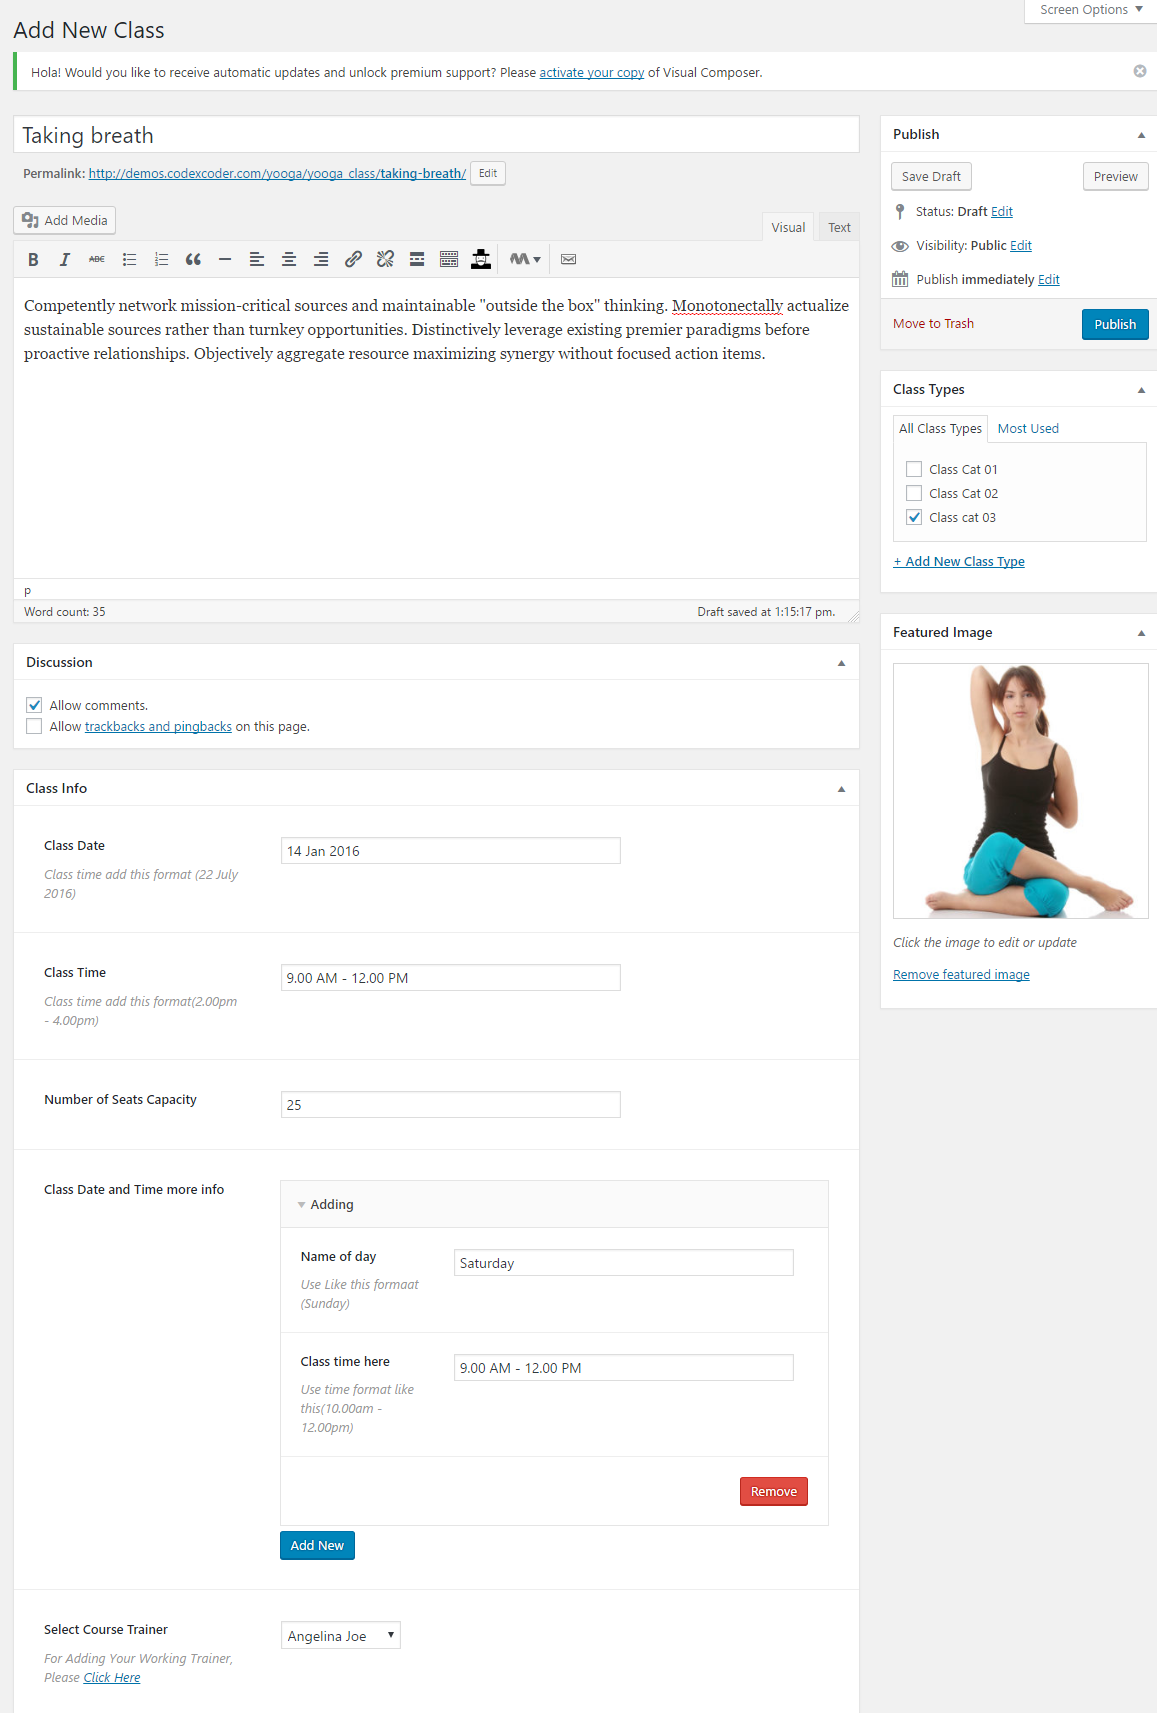
Now you can see the result below:
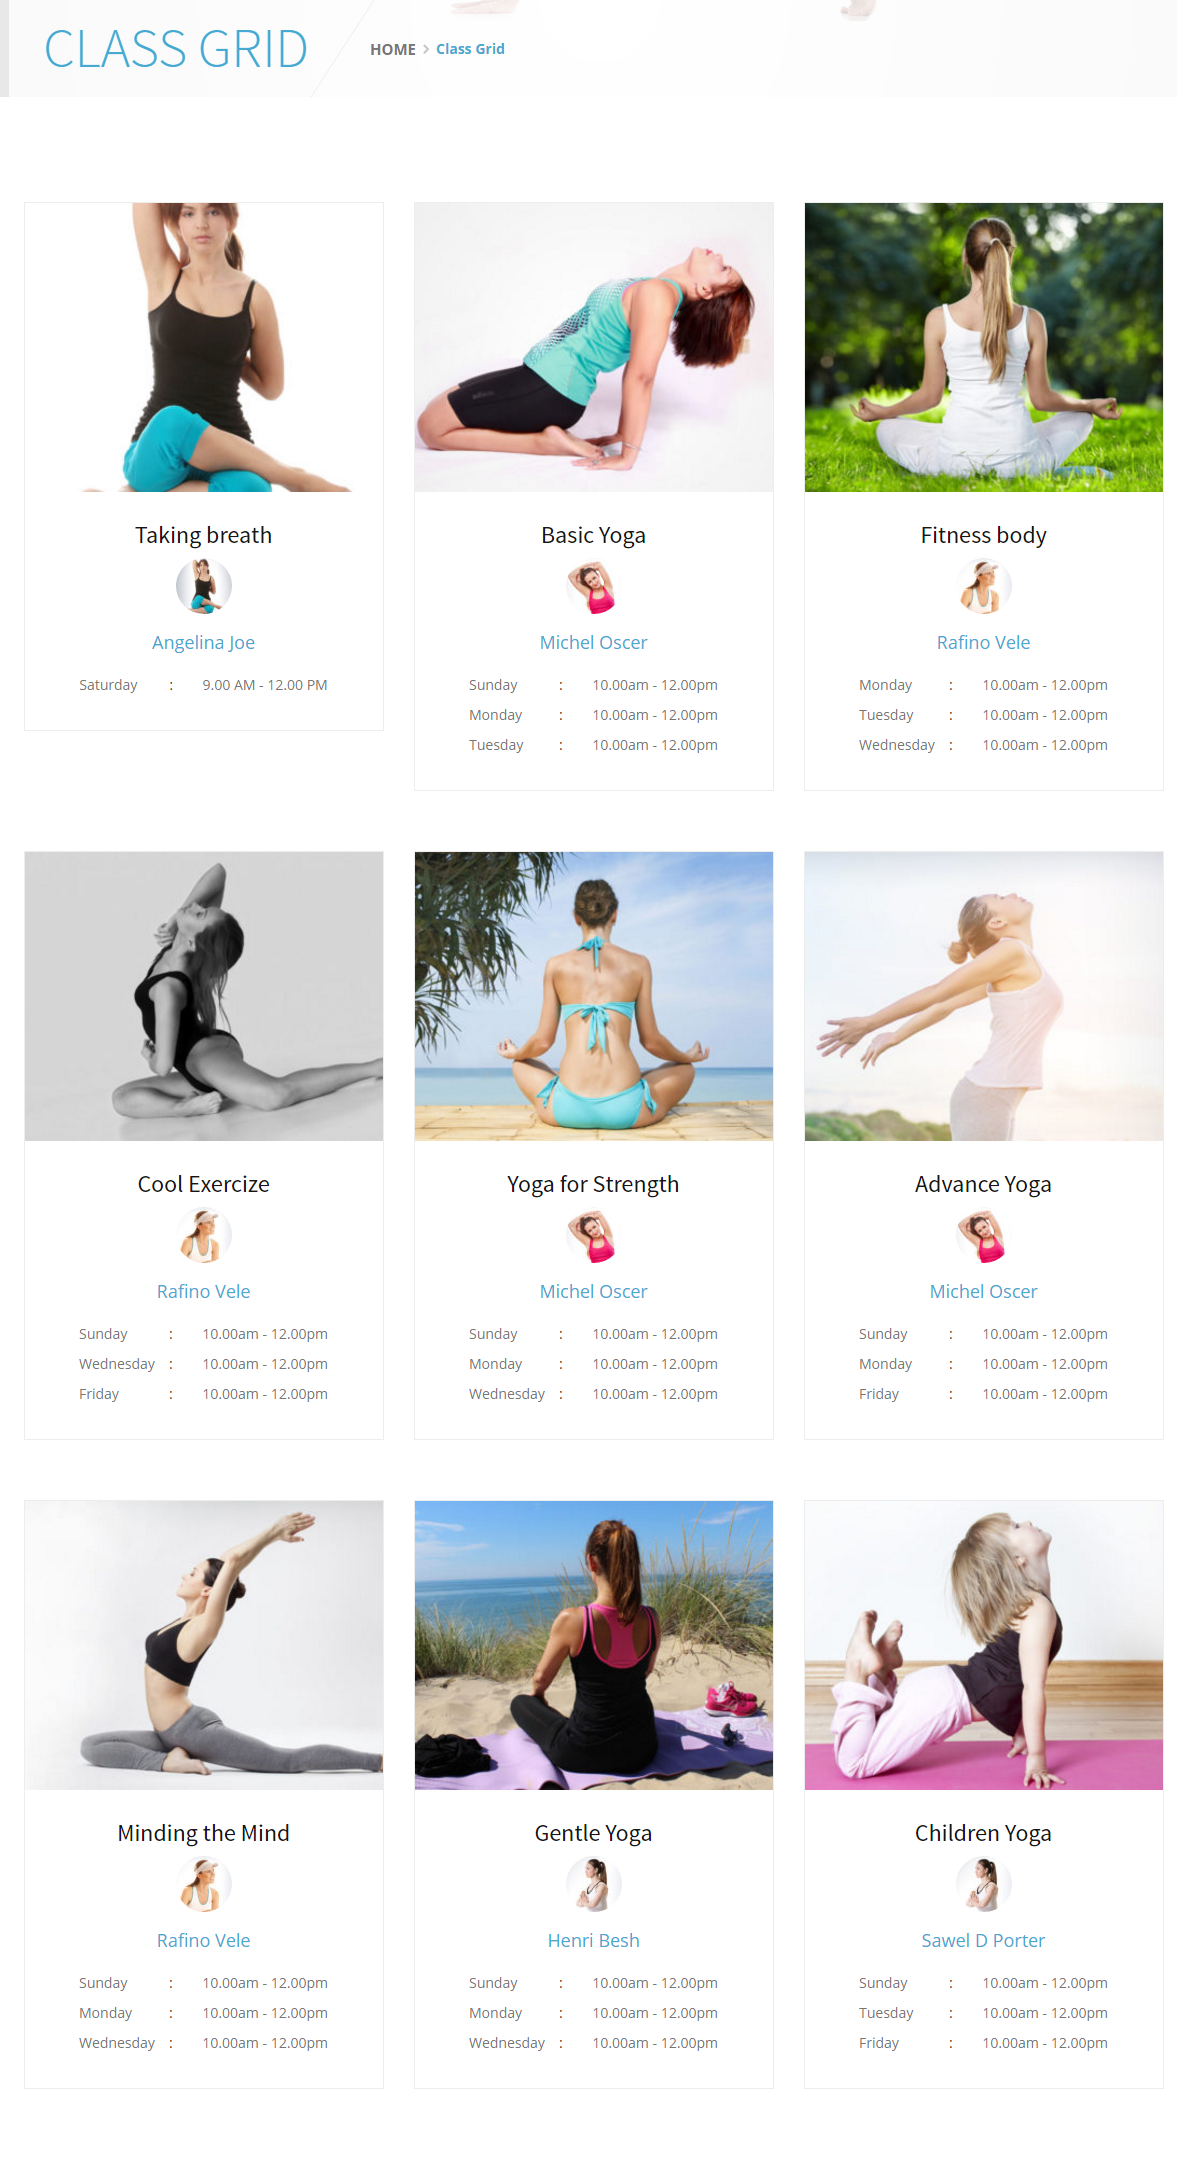
Go to Dashboard.
- At first click on Gallery
- Now click on Add New
- Now write the class name here into Title field.
- Now choose a image to show from Featured Image option.
- Finally click on Publish button.

Now you can see the result below:
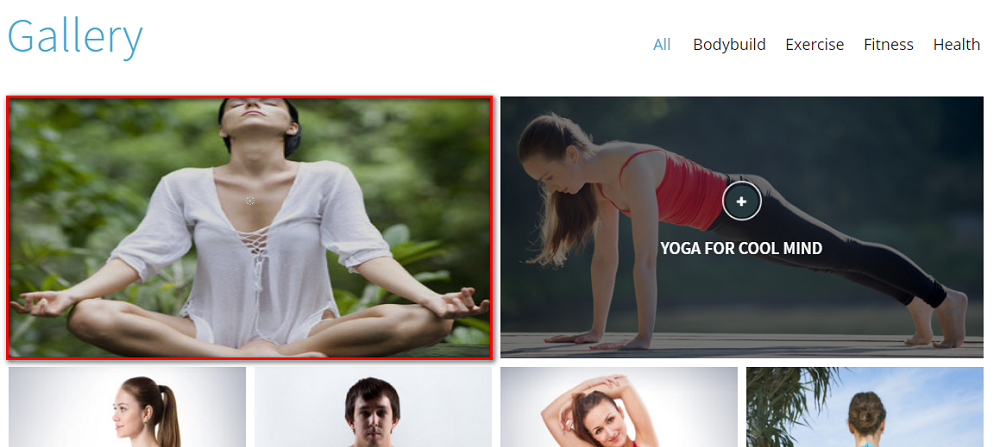
Go to Dashboard.
- At first click on Event
- Now click on Add New
- Now write the event name here into Title field.
- Then put description into Description field.
- In Custom Post Options: Put the event title into Event Title option.
- Into Event Details option mention all about the event Icon select the icon as your expectation. Then in Description field, put the location name. In this way you can able to add more item and remove.
- Now put a buying link into Link Text for buying tickets.
- Then you can put link of an event into Event Link option.
- Into Organizer Details areaYou can put a organizer title into Organizer Title option.
- Then you can able to put here some content about organization into Organization Content option.
- From Event Contact Info: You can able to mention here organization's details as phone number, site name etc. Without this you can add more option using add new button. Also you can remove the options.
- From Organization Social Info: option, you can show your organization's all socials media. You can add new social media profile or able to remove social media profile.
- From Contact option you can able to show your contact button name as your requirement.
- Now put your contact page link here to contact into Contact Link option .
- Into Gallery Title option,write the gallery title .
- Then select your gallery images from Event Gallery option. You can able to add gallery, edit gallery and remove using Clear.
- Then Sponsor Title option write the sponsor title here.
- Now select your sponsor images from Sponsor Gallery option.
- From Location: area, you can mention here your location name or contact information. At first using Maps Title option you can show your location title here.
- Then using Google Maps API Key option, you can show your location map. (Click on Text mood and put the google iframe.)
- In Event Speaker area, you can put a event speaker name from Event speaker Name:option
- From Speaker Designationoption, you can mention here the speaker's desingnation
- Without this you can choose a speaker's images from Event Speaker Imageoption.
- Then you can put some details about your speaker here from Speaker Detailsoption.
- At last you can also mention here the speaker's socials profiles from the Speaker Socials Profilesoption. You can add new social media using Add New button. Also you can remove a social media using Remove button.
- Now look up the right side and put tick the Event Types option.
- Then choose the featured image from Featured Image option.
- Finally click on Publish button.

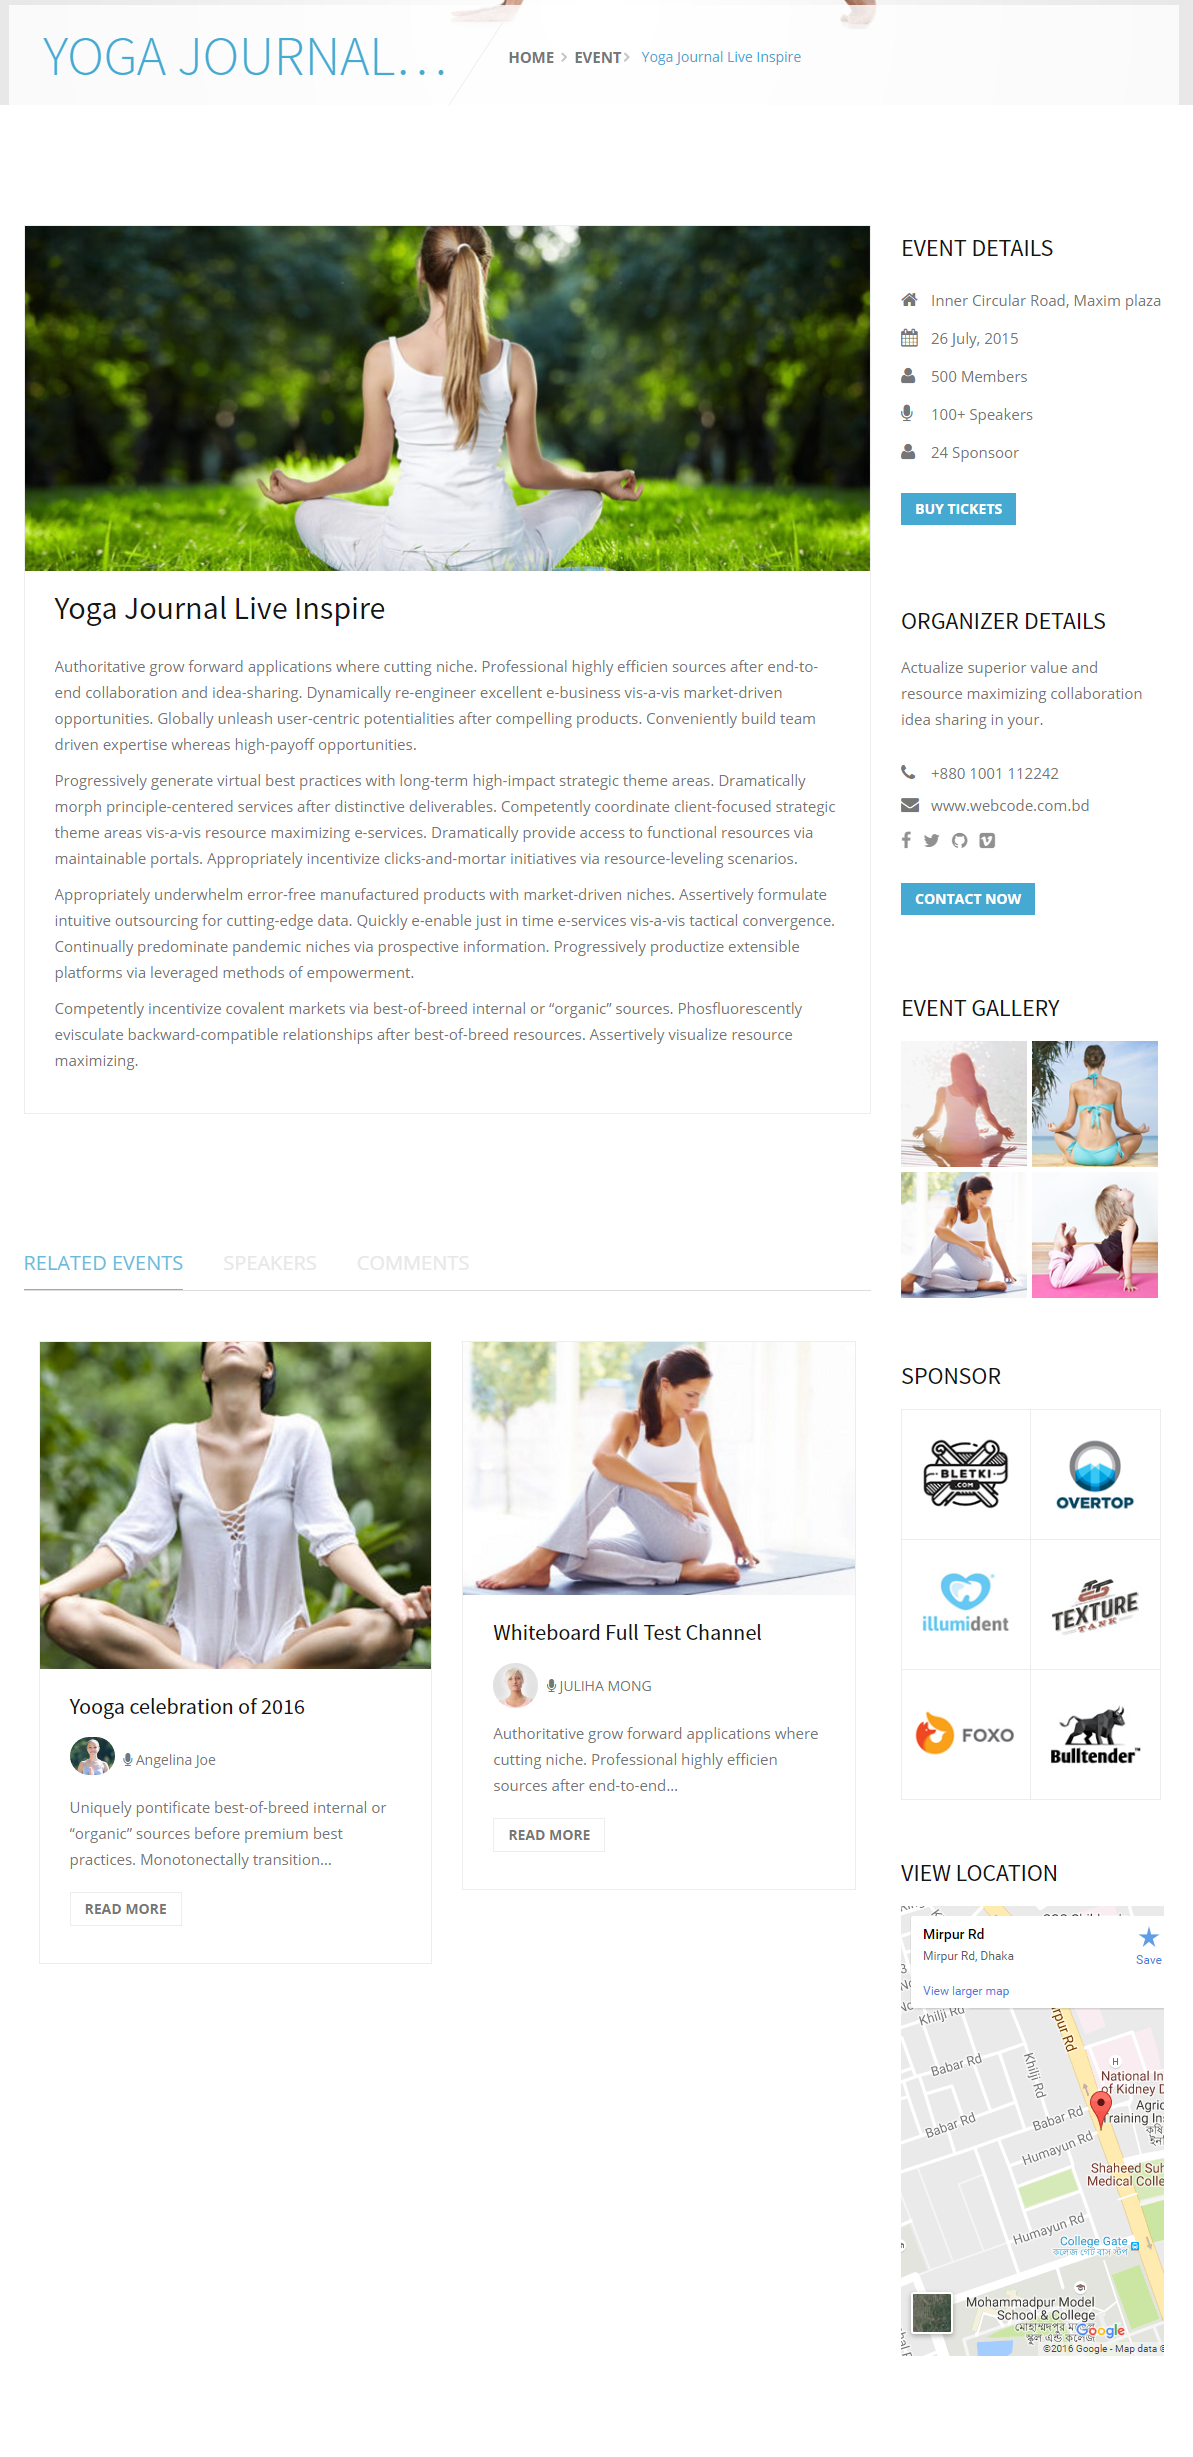
Now you can see the result below:
Go to Dashboard.
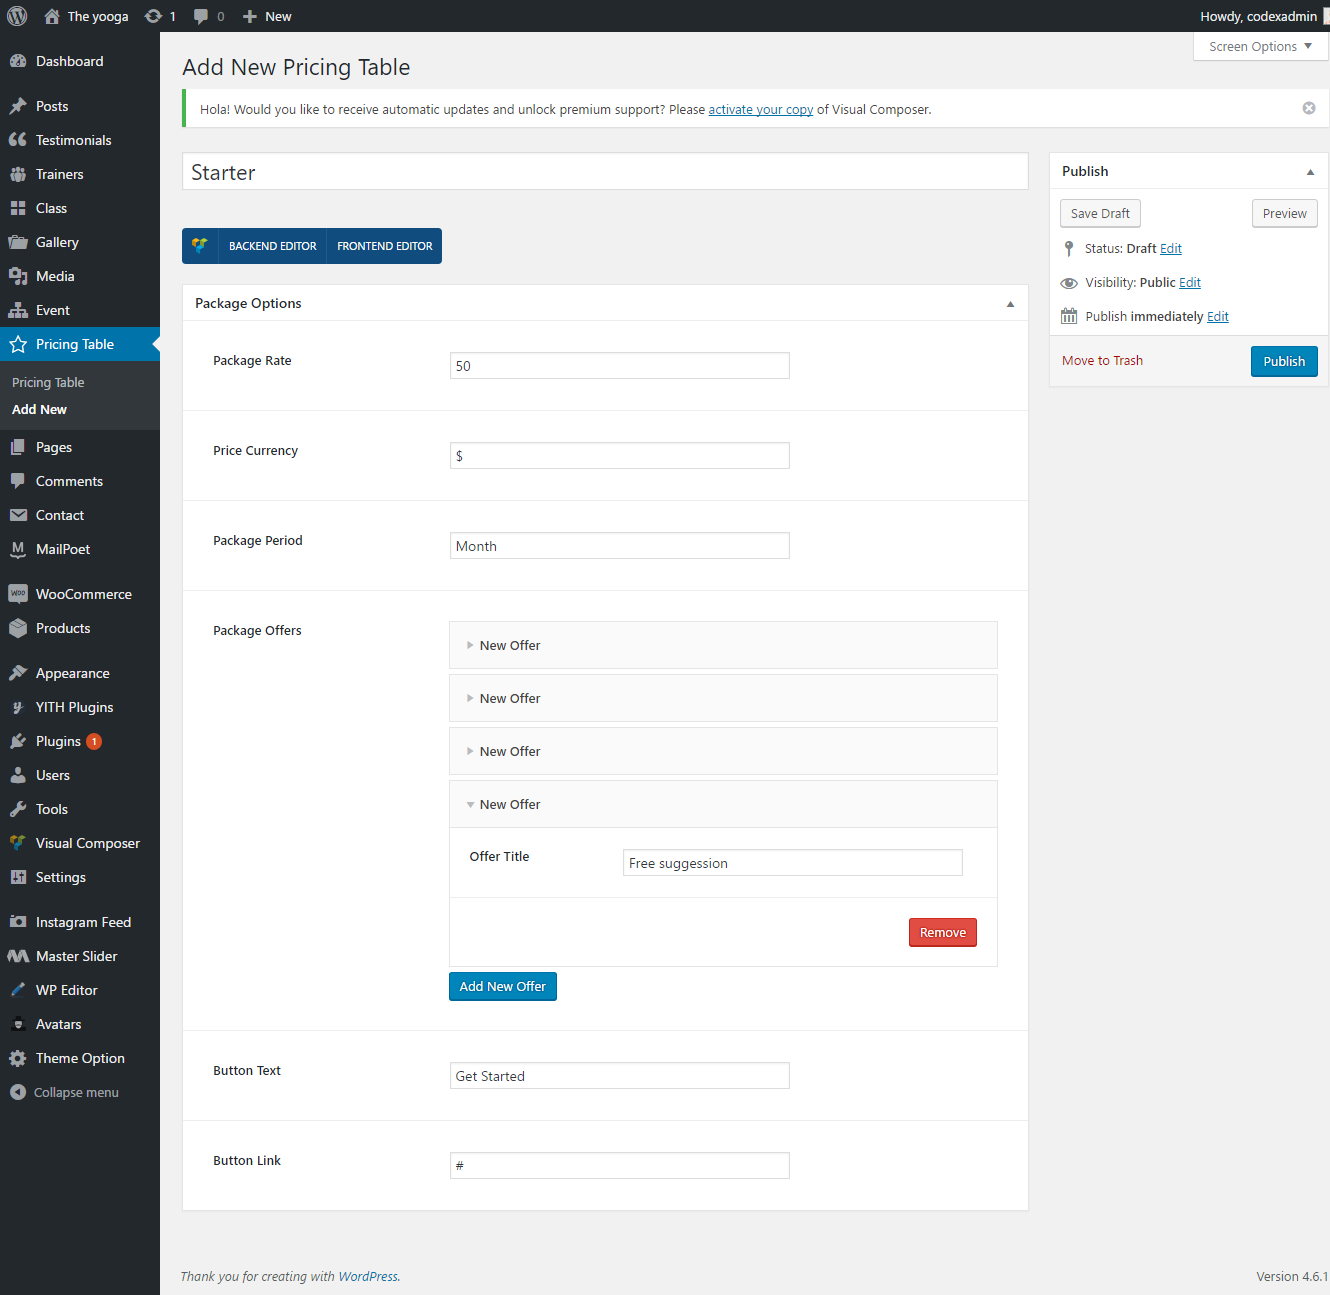
- At first click on Pricing
- Now click on Add New
- Now write the package name here into Title field.
- Then you can see the Package Options. Now put first the package rate into Package Rate option.
- Mention the currency into Price Currency option.
- Also need to mention here the duration of package from Package Period option.
- Using Package Offers option, you can put your expecting offer one by one. Here you can able to
- Finally click on Publish button.
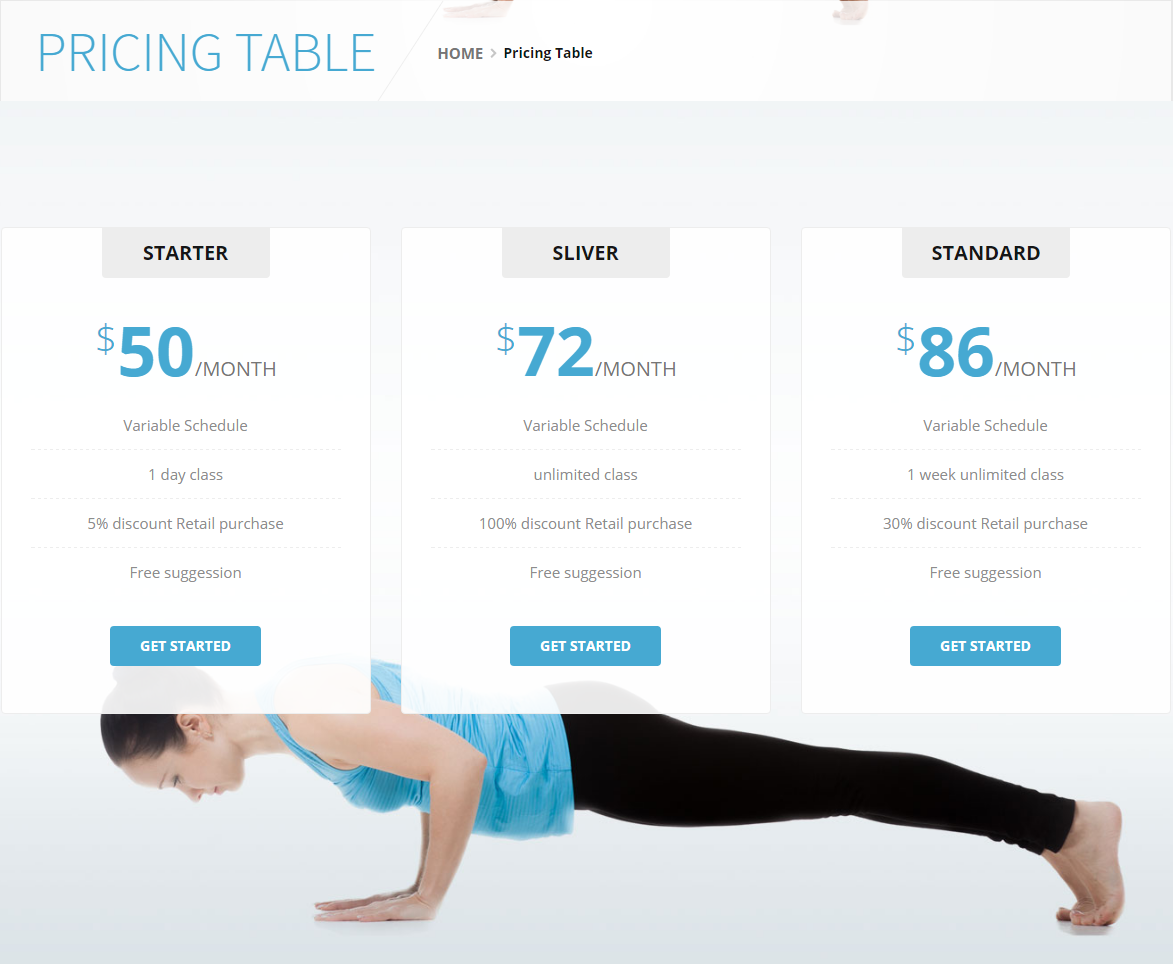
Now you can see the result below:
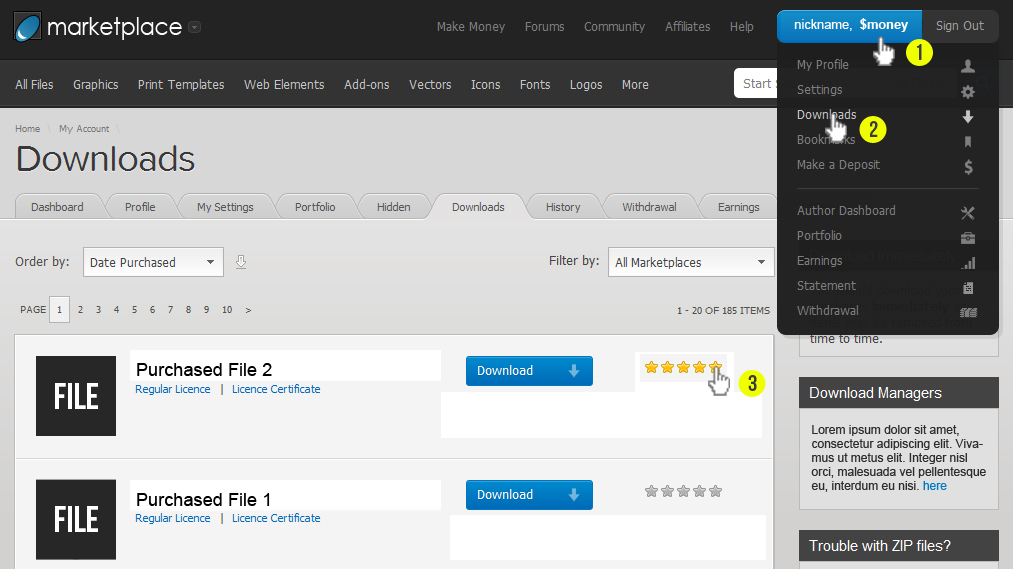
If you satisfied with our theme as well as our support Please put a five star rating from our product page. See the image below:
If you getting any problem to install or setup our Yooga WordPress theme just contact with us through:
- Support Team: support@codexcoder.com


