Thank you so much for purchase our Moon Light WordPress theme. Feel Free to contact with us for any issue. You can write us here: support@codexcoder.com
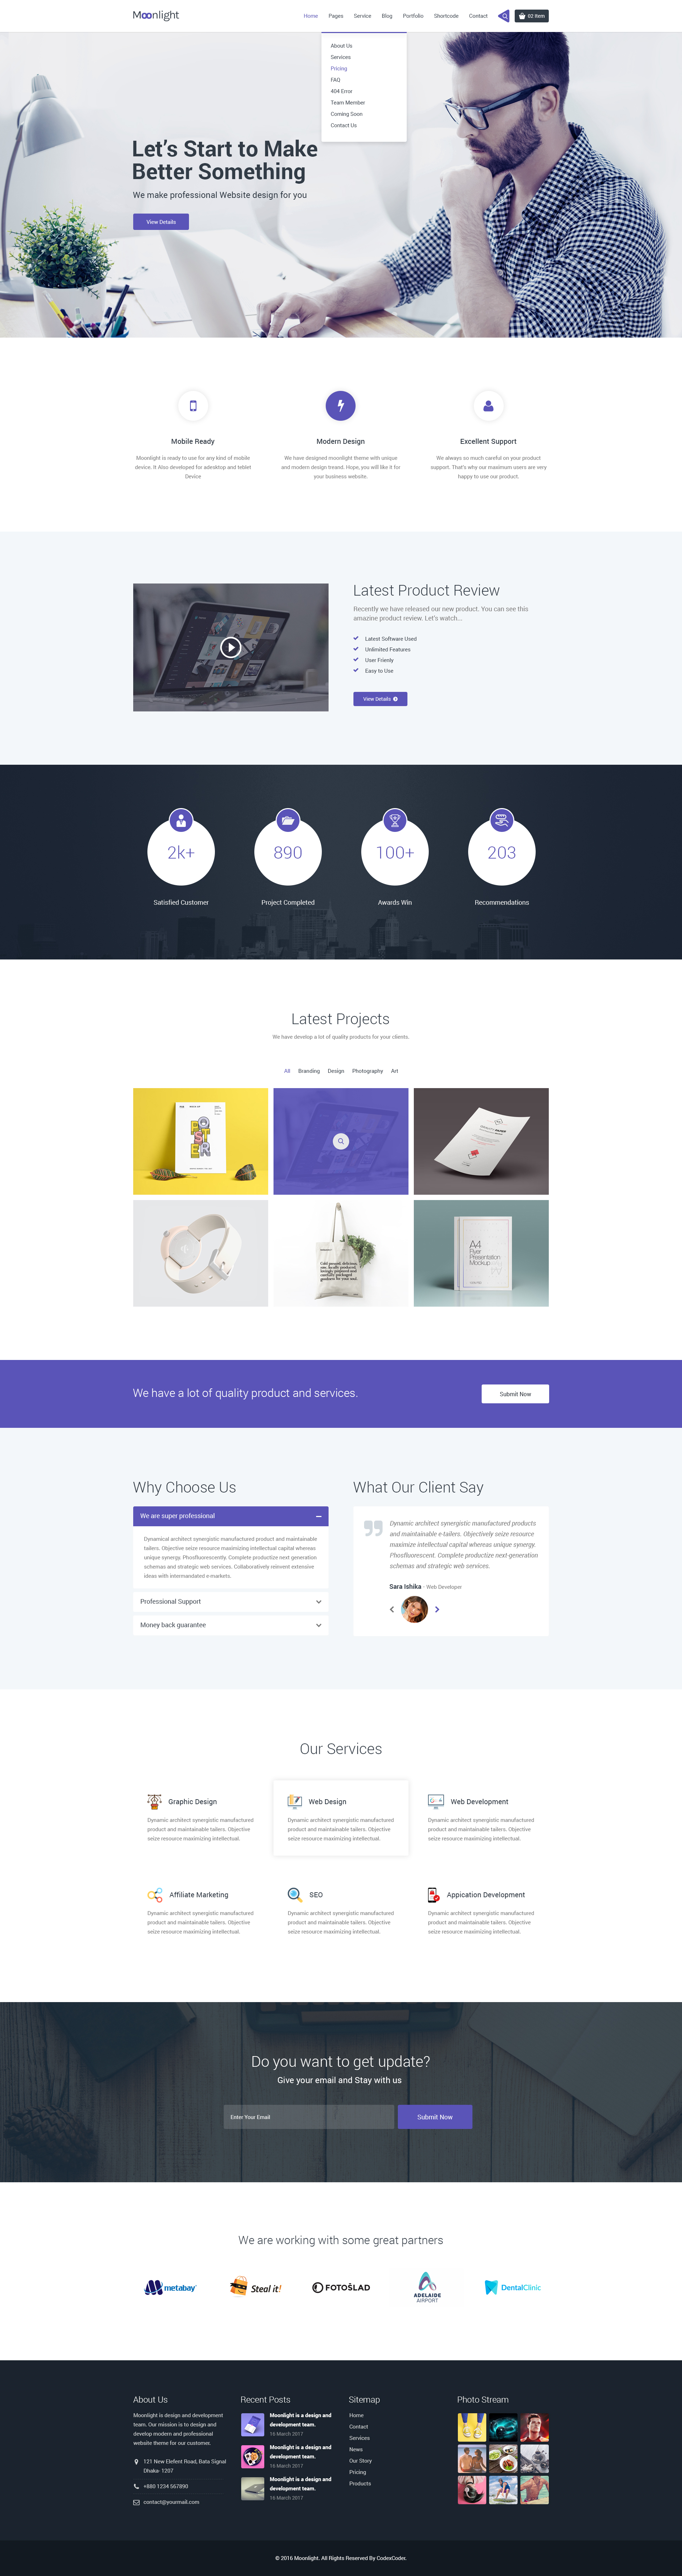
MoonLight
A Beautiful, Professional clean, modern, user friendly, fast-loading, customizable, flexible, and functional business WordPress theme.
- By: CodexCoder
- Email: support@codexcoder.com
A Beautiful, Professional clean, modern, user friendly, fast-loading, customizable, flexible, and functional business WordPress theme. It uses the best clean SEO practices, overall it is fast, simple, and easy to use. We offer a strong support and friendly help 24/7.
The first option how to install MoonLight WordPress Theme would be to directly upload the moon-light.zip file via WordPress Theme Uploader.
- Login to your WordPress admin
- Navigate to Appearance > Themes
- Click Install Themes/Add Themes
- Click Upload/Upload Themes
- Now you just need to find the "moon-light.zip" in the Upload folder and hit Install now.
- After Installed then click Active Now
Theme Install From FTP
The second option how to install this Theme would be the upload via FTP manager. It really dosen't matter which of the two ways you choose, just choose the one you feel more comfortable with.
-
Login to your FTP account and navigate to your WordPress Installation directory
-
Navigate to the folder /wp-content/themes
-
Upload the "MoonLight" folder (not the .zip-file). This is the folder located inside the "Upload" folder in the zip-file you've downloaded from CodexCoder.
-
Now log into your WordPress backend
-
Navigate to Appearance > Themes
-
Find the Theme and click Activate
After installing the theme, you can see the notice below screenshot:
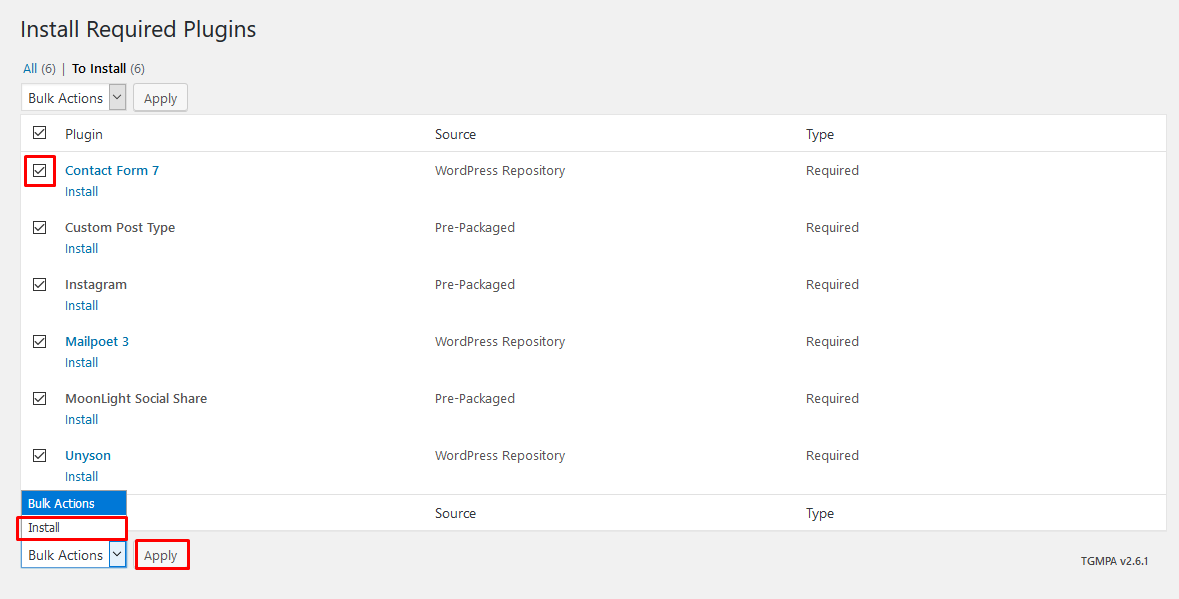
Now click on Begin Installing Plugins.

Put tick all the plugins and select the Install and click on Apply.
Now you can see the all installed plugins name and their installed message.
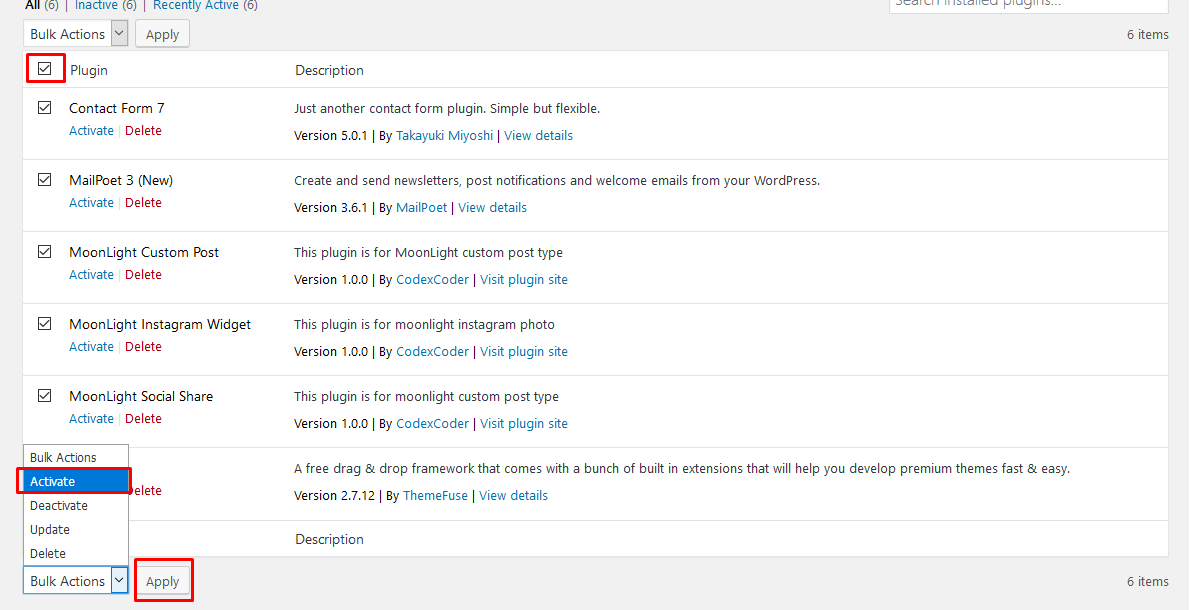
Finally, you put tick all plugins and click on Activate option individually or from Bulk Actions and click on Apply
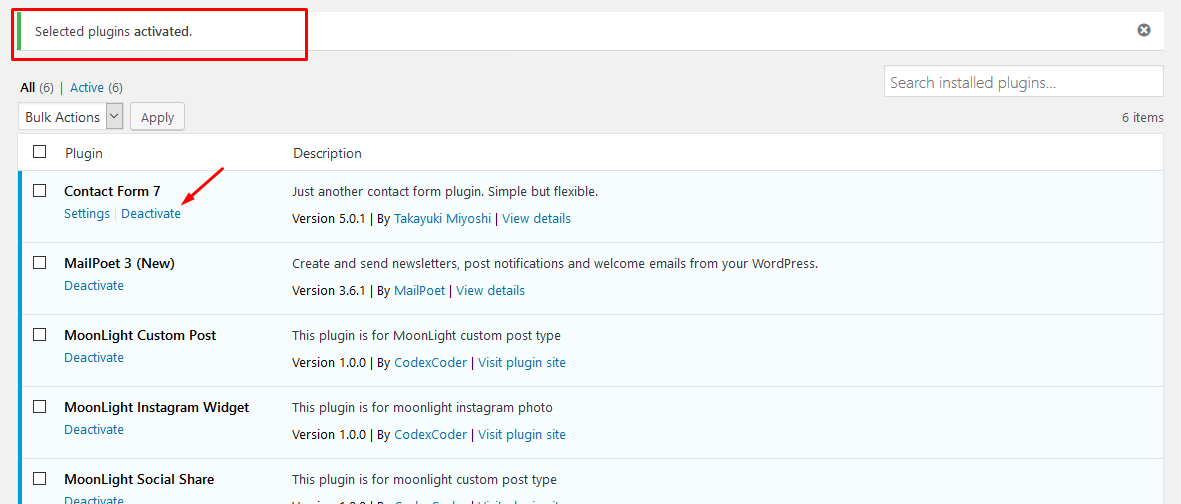
Now you can see the plugins are activated and you will able to use theme.
The theme comes with a One Click Demo Import package. This package includes all posts, pages, comments, settings, image and so on.
Recommended PHP Settings
In order to avoid any possible import issues because of your server and php setings, we would recommend setting following PHP values in your server’s php.ini:
Memory Size: memory_limit = 256M
Script execution time: max_execution_time = 400
Number of input variables: max_input_vars = 4000
If you don’t have an access to the php configurtation on your server, you can try to set this values in .htaccess file:
php_value max_input_vars 4000
php_value max_execution_time 400
php_value memory_limit 256M
Please be careful, because some of hosting companies don’t allow to change php settings directly using .htaccess. In case you have some problems after modifying your .htaccess file, log in to your FTP account and remove these modifiactions from .htaccess
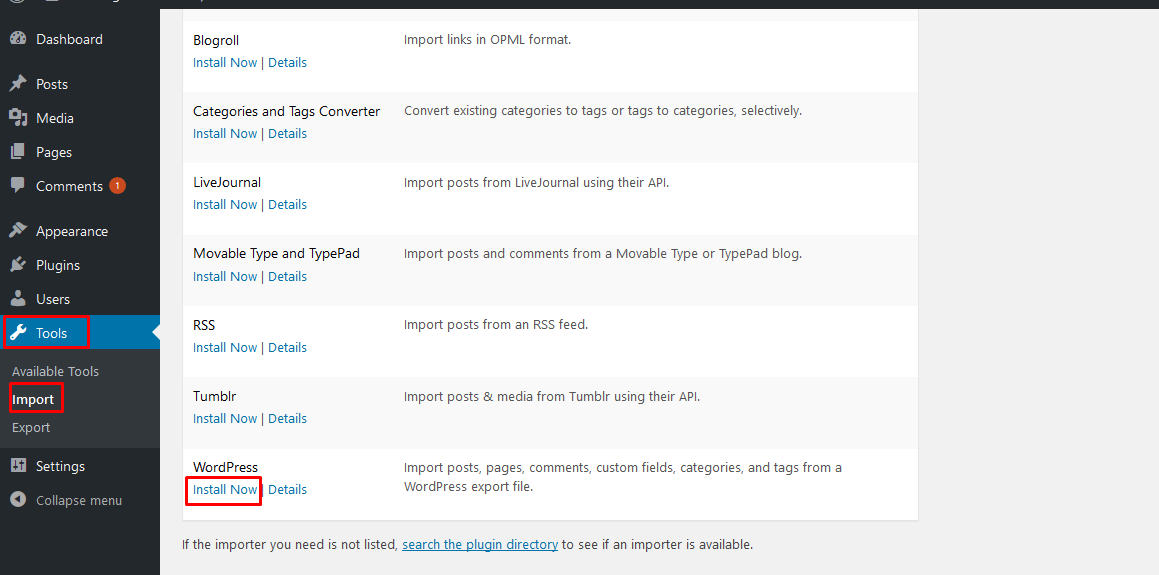
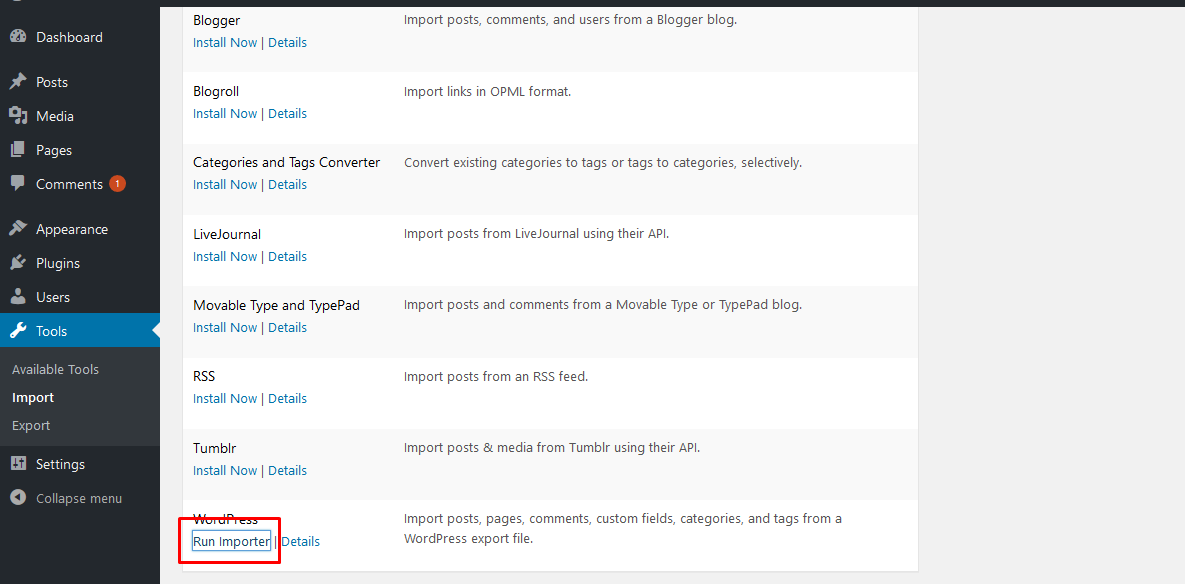
To import demo Data, you can follow these steps:
- In WordPress Admin go to Tools > Import
- Before clicking on the Import button please make sure that all the required plugins are activated.
- Now click on follow the instraction like bellow
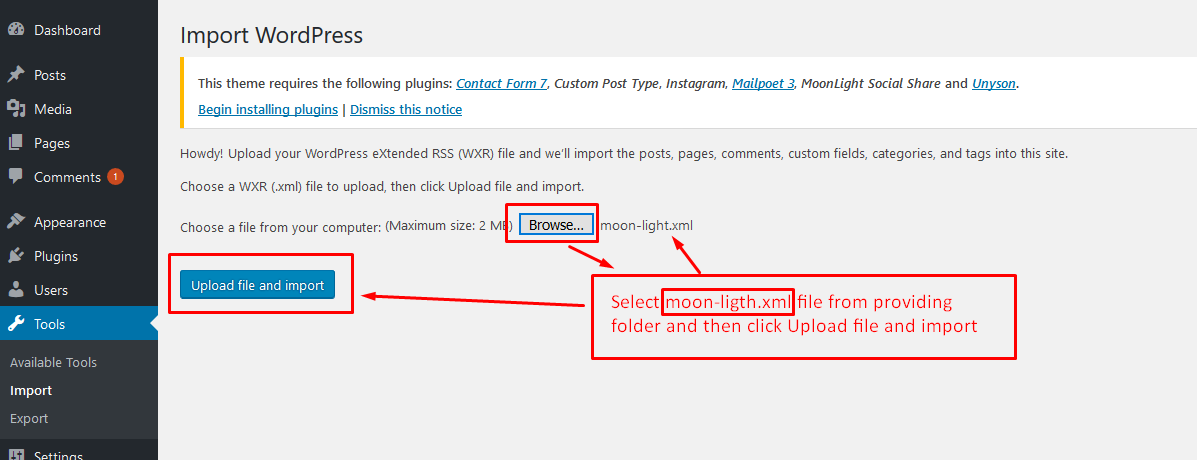
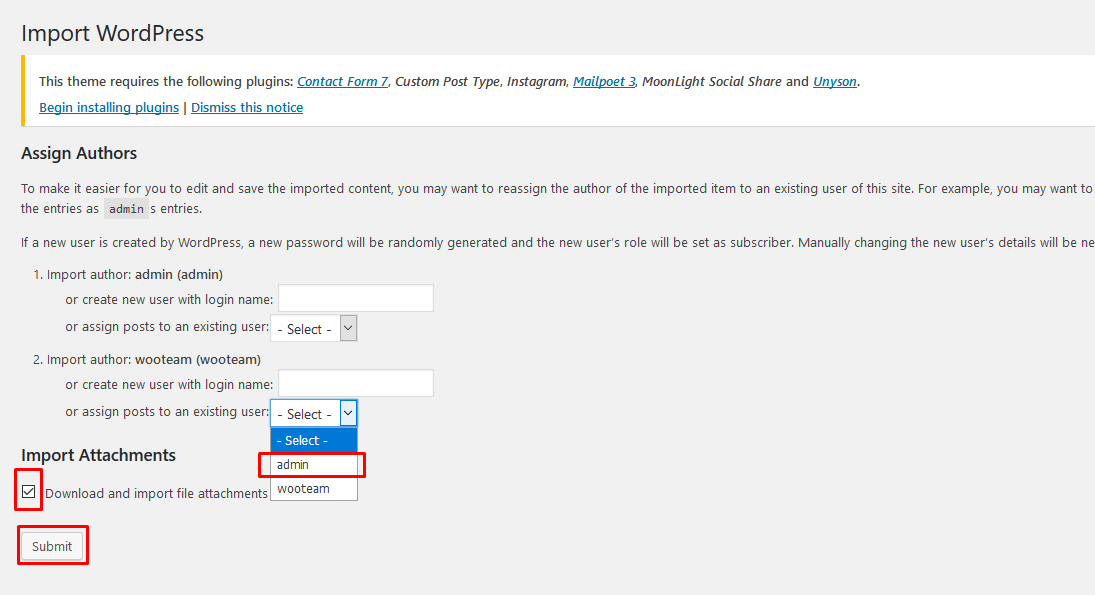
These steps will take couple of minutes. Take some tea or coffee meanwhile.
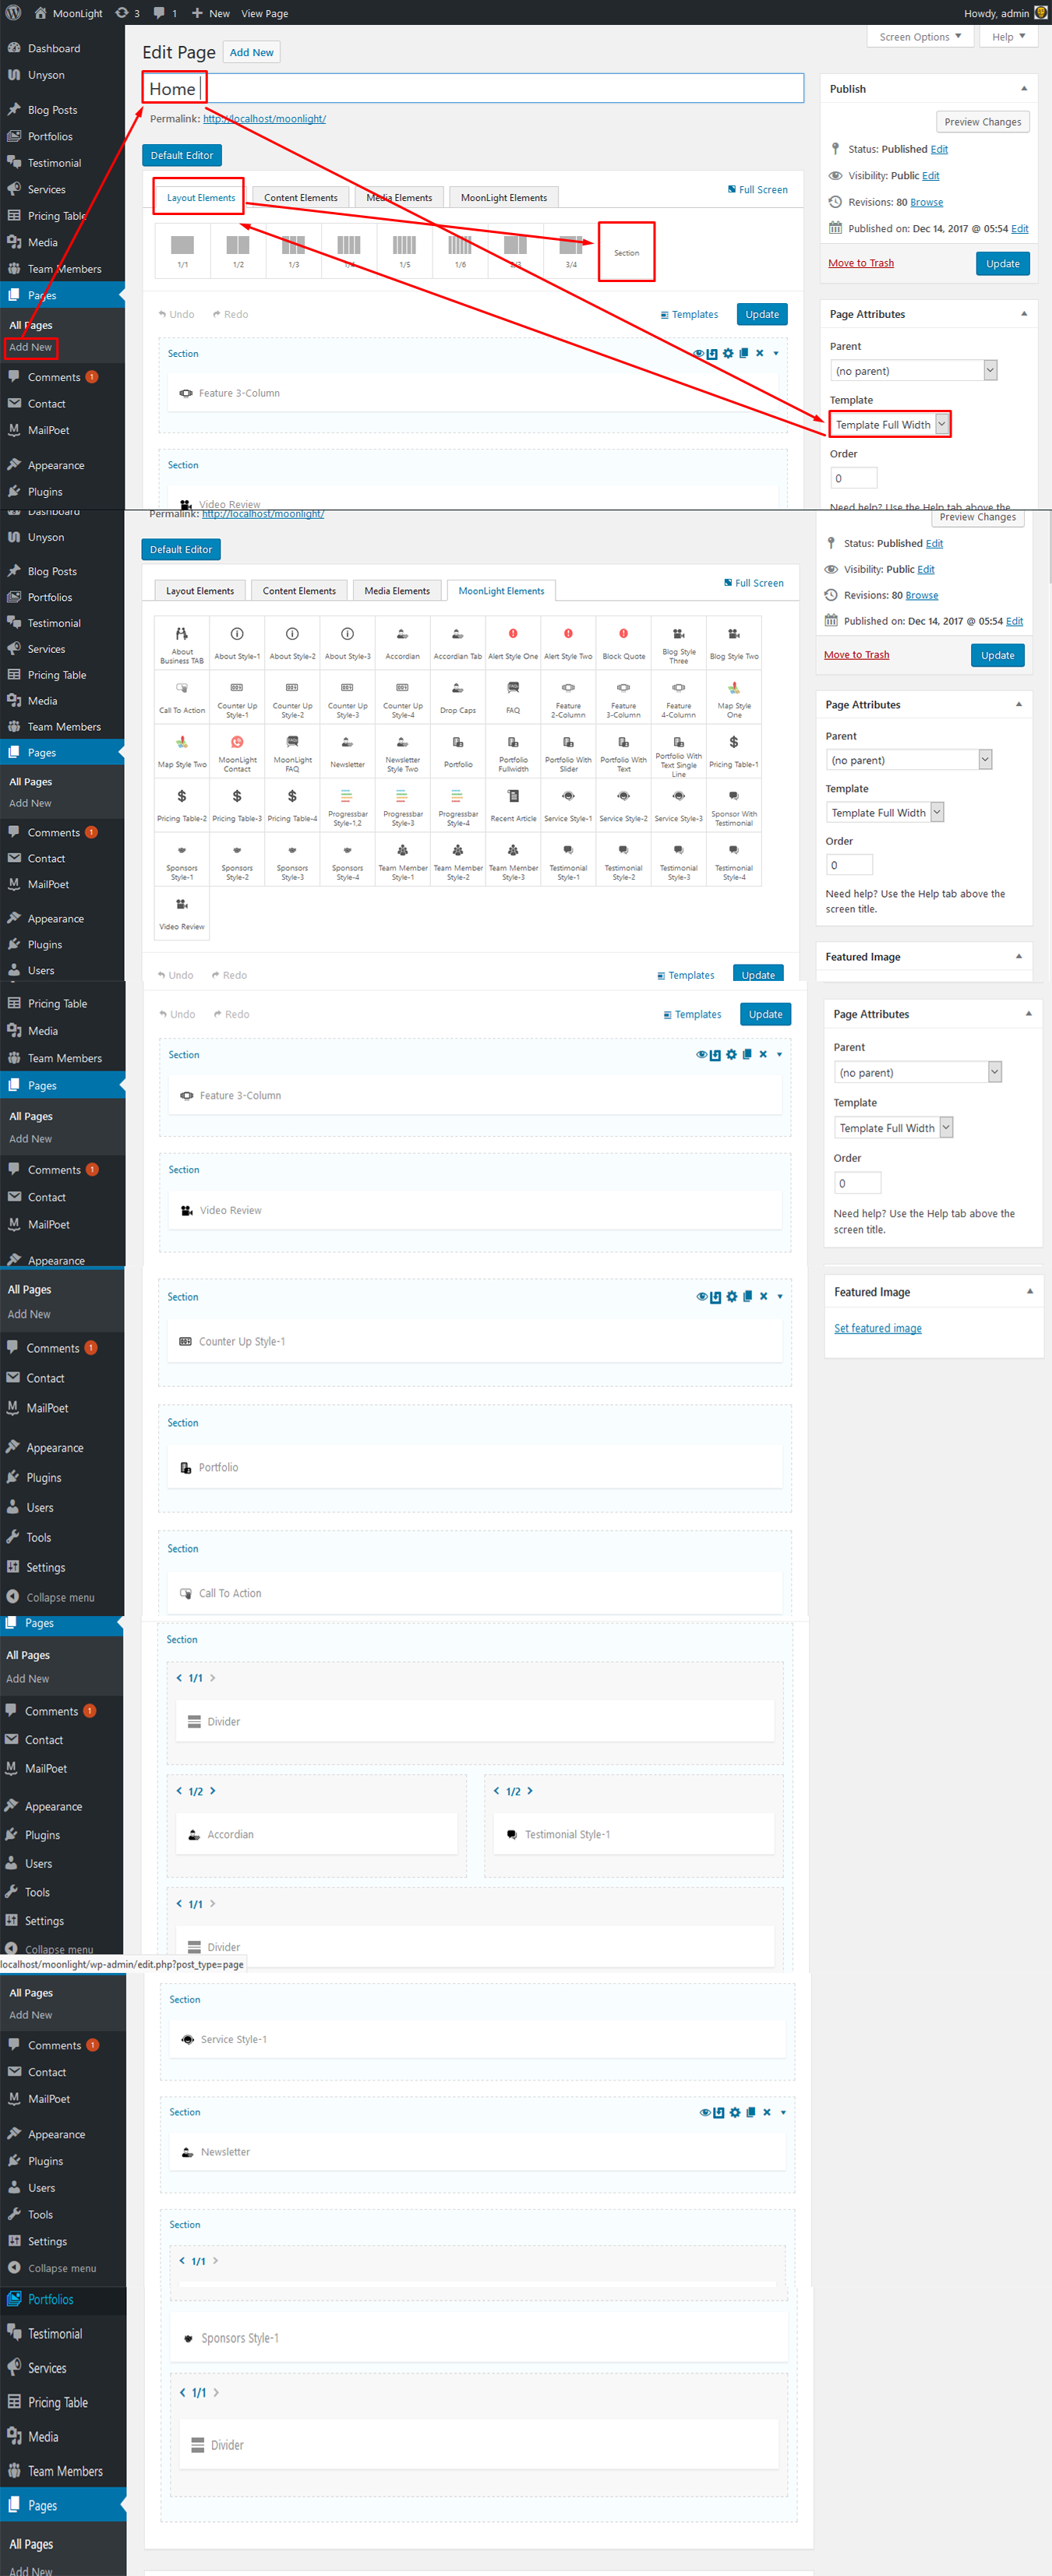
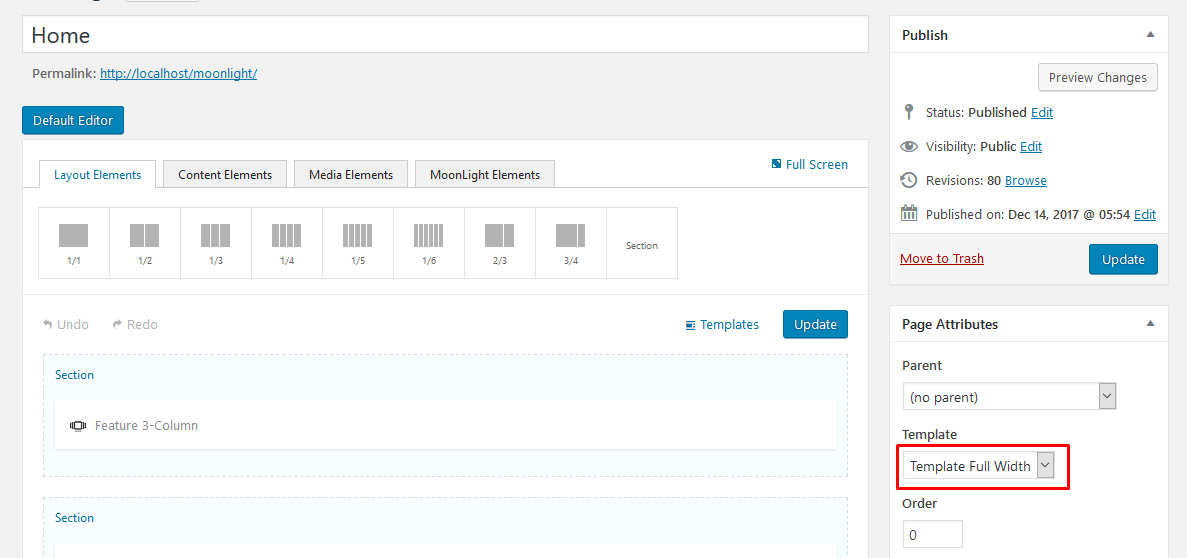
- Go to Dashboard and click on Pages > Add New
- Select Template > Template Full Width from right sidebar Page Attributes
- Write a title of your page into Title field. Example as : Home
- Then add shortcodes which you want to display in this page into editor.
- You can use the custom page setting option from Custom Page Settings option.
- In Custom Page Settings option you will able to change the header style using Header Style. There are three header styles.
- Here also the option of Transparent Menu on/off. You will able to handle your transparent menu on/off.
- Using Page Header option, you can show or hide page info with page title, background image and breadcrumb
- In Banner area you will able to show or hide the Page banner with event counter.
- There are nine type of banner style in Event Term. You can use anyone of them by choosing Banner Style option.
- You can use image or uploaded video or external video or youtube video as your banner background by filling up relevant fields.
- If you want to write your banner title, you can write here your banner title into Banner Title field.
- To display event counter in banner enter event date and time using this format (2018-06-12 8:00:00) into Event Date and Time for Counter field.
- At last you can write here your banner subtitle using Banner sub title (banner 3 & 4). You can use this field only for home page three and home page four.
- Finally click on Publish button.
Fill up all fields carefully, you will able to see the screenshot below:(We mention here the banner area only.)
Go to Dashboard and click on Settings > Reading. Please see the screenshot below and do as it.
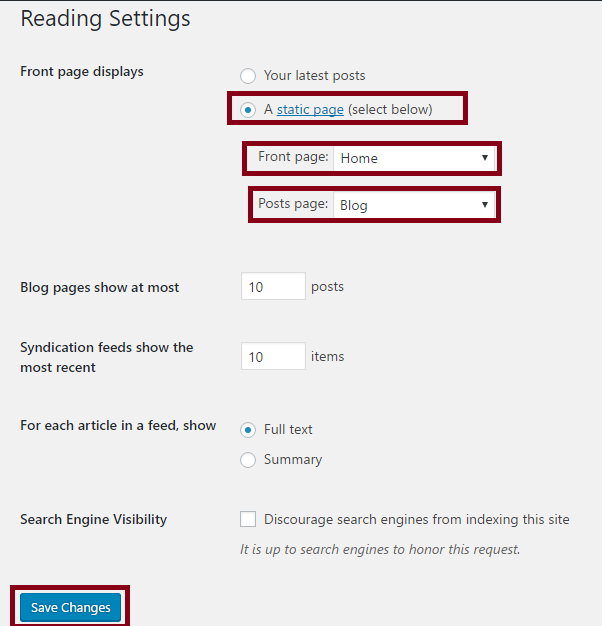
But if you want to show your homepage as full width, you need to select Template Full Width as screenshot below .
All of our Themes are able to be translated into any language. The process of translating the theme is a user responsibility. The following instructions are given as guidance.
- Open wp-config.php and replace this:
define ('WPLANG', ''); with this (subsitute the language string (bg_BG) with your own!): define ('WPLANG', 'bg_BG');
- Download and install POEDIT
- Connect to your site -> open your theme/languages directory
- Download the default.po file and open it with POEDIT.
- Translate file and save it as bg_BG (the file name must match with the string you inserted into wp-config.php)
- Two files will be generated after save. bg_BG.po and bg_BG.mo
- Upload the .mo and .po files into wp-content/themes/your-theme/languages folder
Your WordPress installation should be in the language you intend on using the site.
Important info, regarding translation in WordPress.
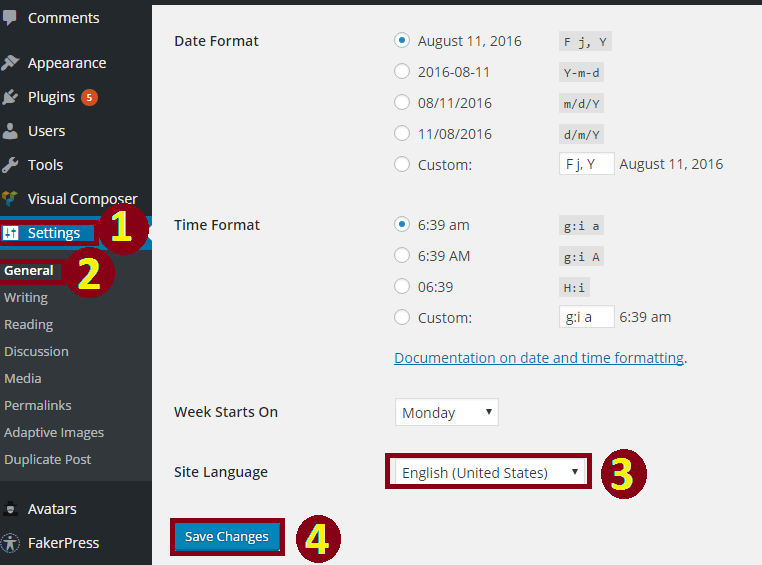
- Go to (WordPress Dashboard > Settings > General)
- Select your website langauge as shown in this screenshot:
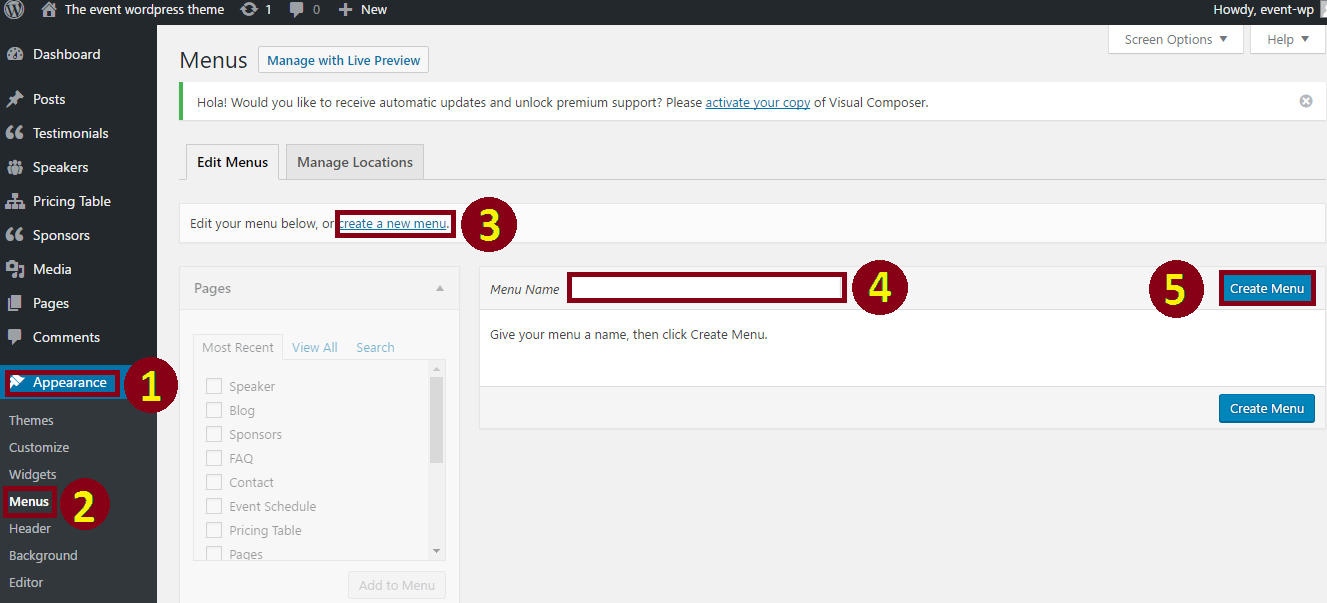
For your primary menu first go to dashboard
- Click on Appearence
- Click on Menus
- Click on create a new menu(Primary Menu)
- Write your menu name. Example: Main Menu.
- Click on Create Menu.
6. Select menu's element from Pages or Custom Links. (Put tick)
7. Click on Add to Menu button.
8. Now decorate your menu drugging up and down by cursor.
9. Put tick in Primary Menu.
10. Click on Save Menu.
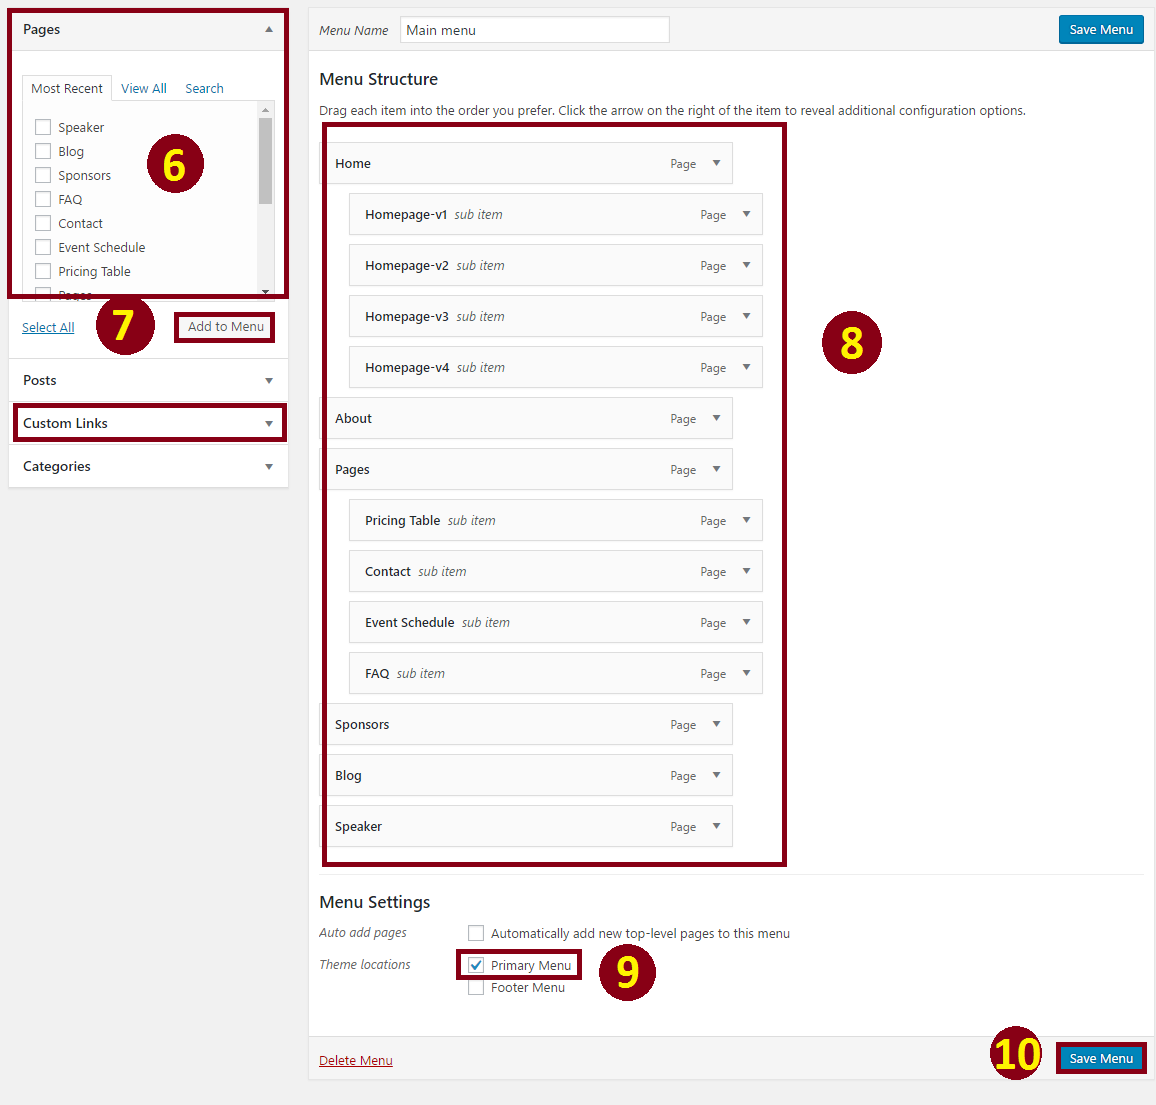
Now you can see the outlook of your selected menu.

1. Click on pages > 2. Click on Add New > 3. Put the title of your page. > 4. Click on Visual Page Builder
5. Now click on + Layout Element .
6. Now click on + Section .
7. Now click on + MoonLight Elements .
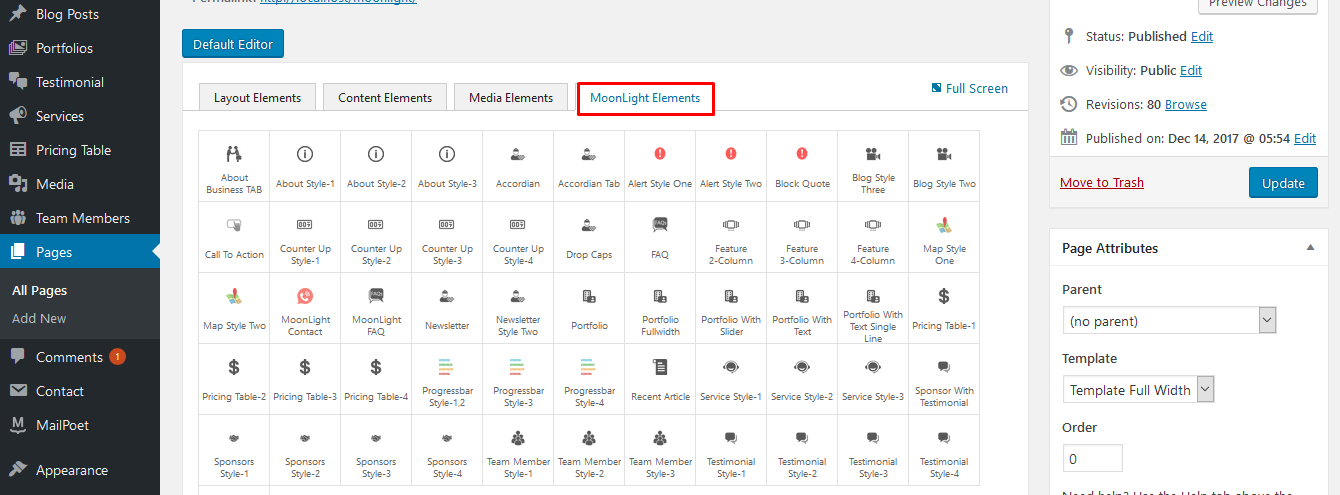
7. And choose an element. Example: Recent Article .
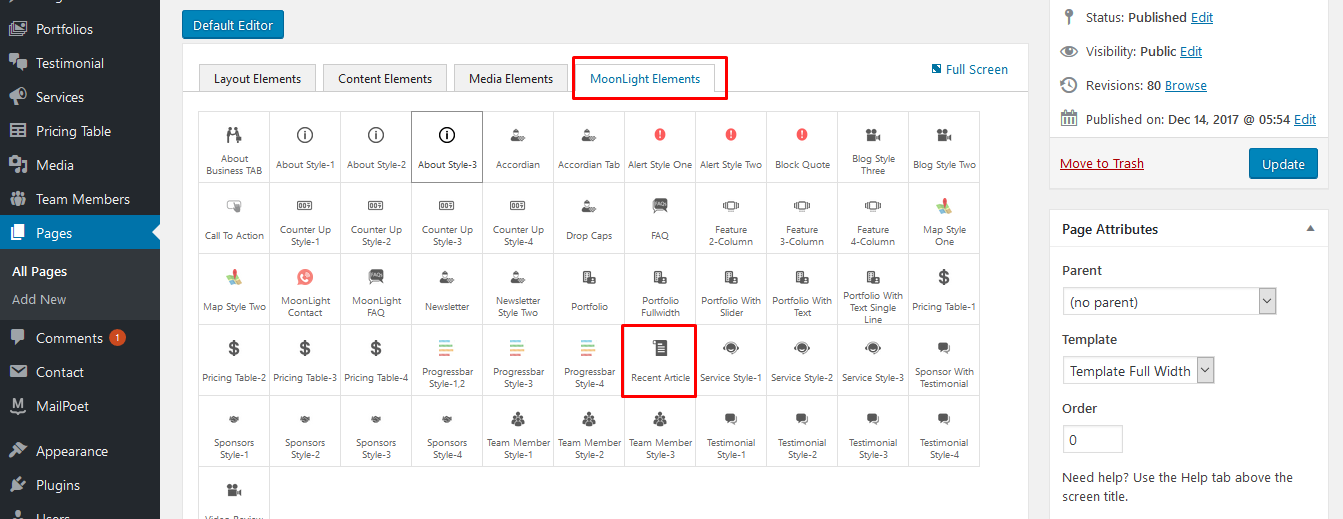
8. Write a title into Title options.
9. Write sub title into Sub Title optios.
10. Mention your post limit from Post Limit optios.
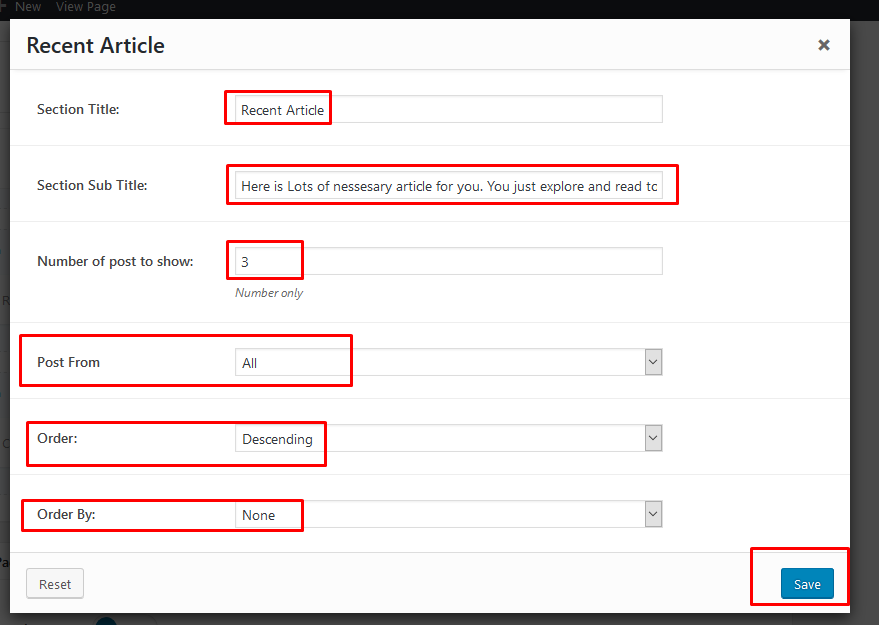
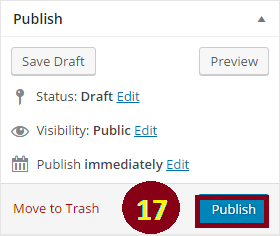
11.Click on Publish button.
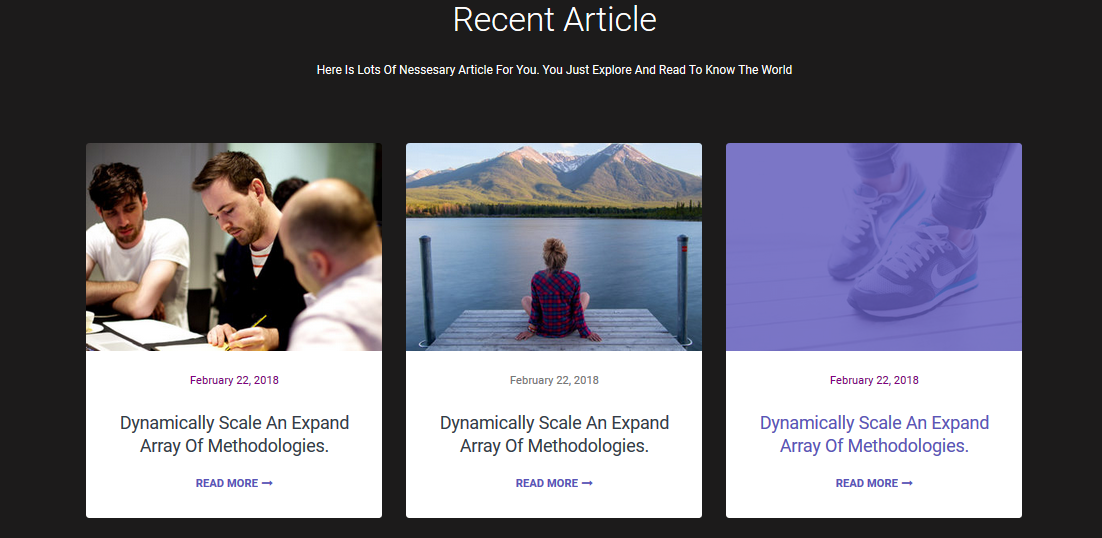
Now you can see the outlook looks below:
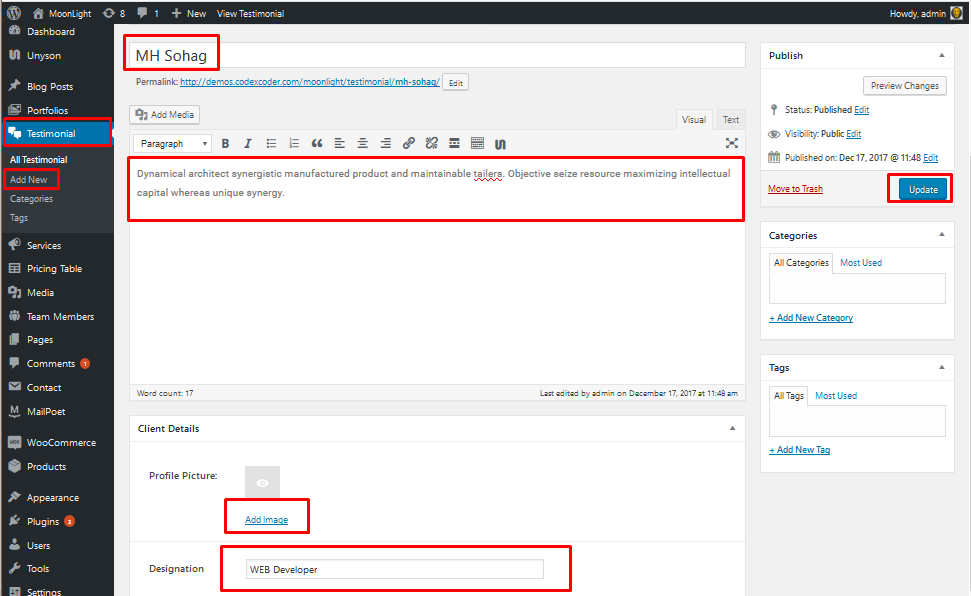
- At first you need to go to dashboard and select the custom post Testimonials option.
- Click on Add New.
- Now put your client's name into First Filed as screenshot's. Put your clients testimonials into description's area. Now put your clients designation into Client Designation field and upload an image of your client's from Client Image (recommended size 150*150) option.
- At last click on Publish button.
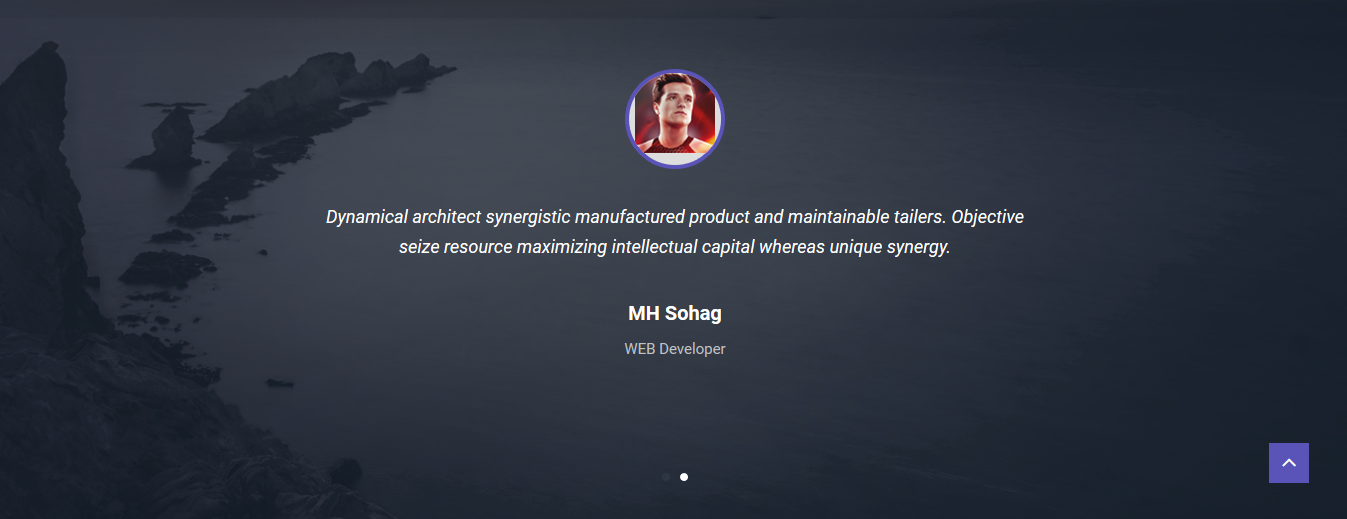
Go to any page:
take any testimonial shortcode inside the section
There are 3 more style for testimonial choose anyone
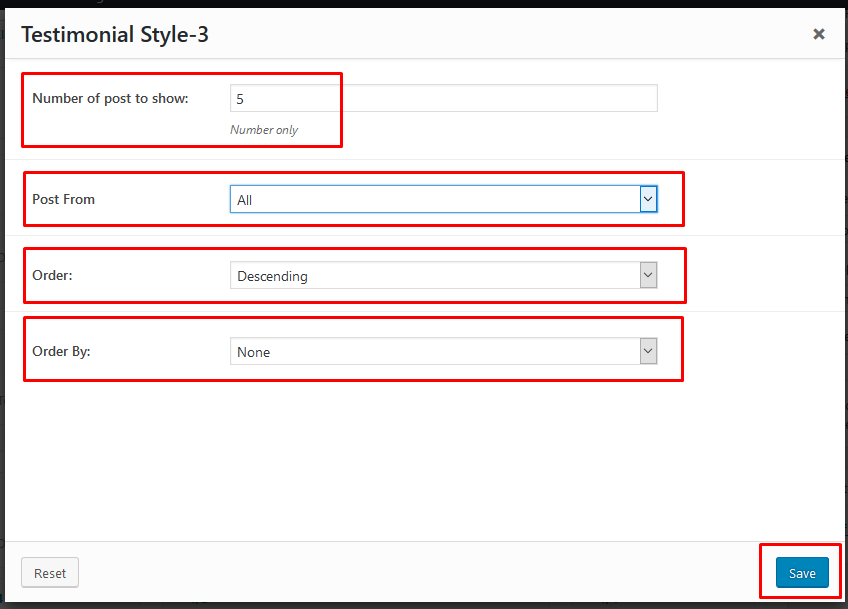
Finally you can see the screenshot below:
Custom Post Type Team Members
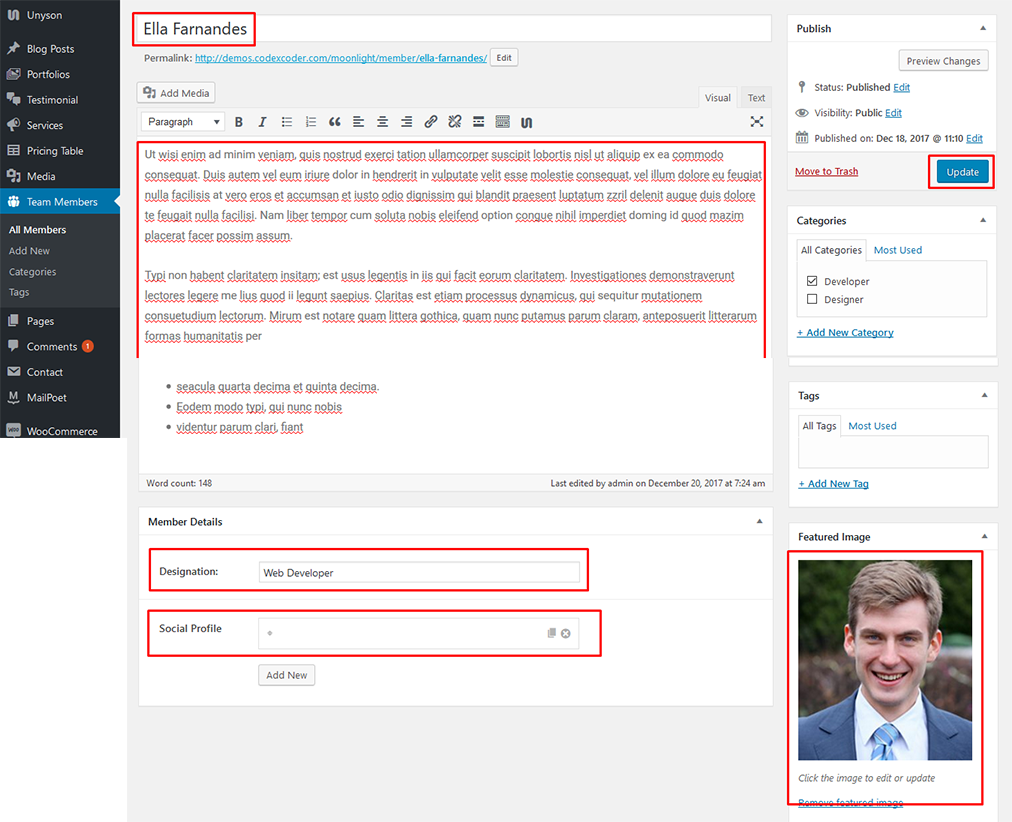
- At first you need to go to dashboard and select the custom post Team Members option.
- Click on Add New.
- Now put your Member's name into First Filed as screenshot's. Put your member's description into description's area. Now put your member's designation into Designation field . Now put all social media link of your member's and upload an image of your member's from Feature Image option.
- At last click on Publish button.
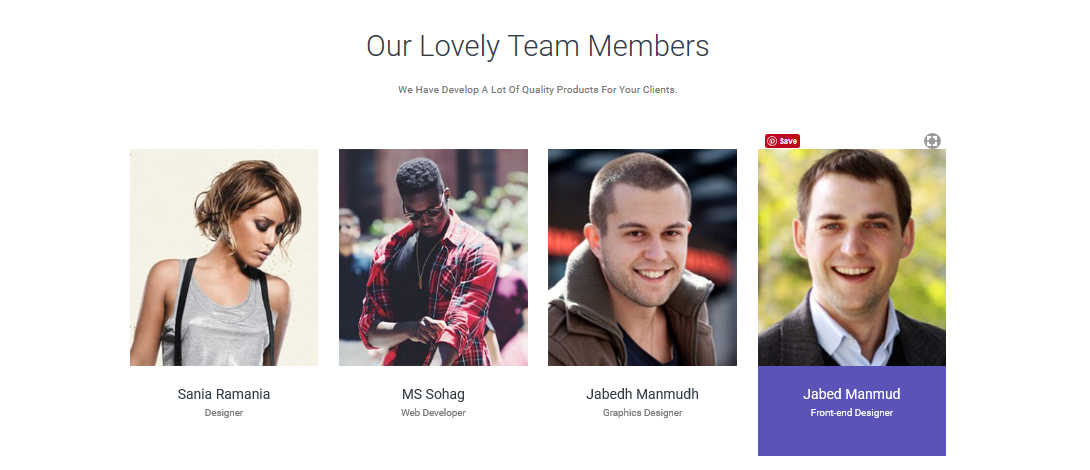
Finally you will able to see the screenshot like below:
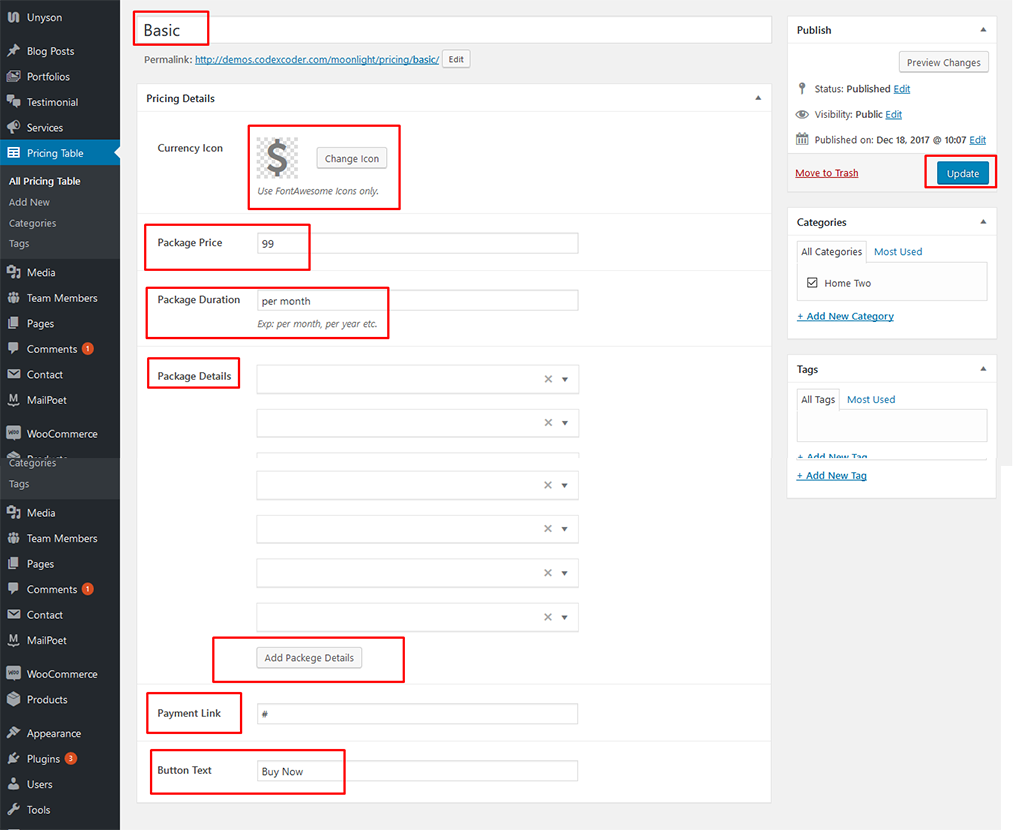
Custom Post Type Pricing
- At first you need to go to dashboard and select the custom post Pricing option.
- Click on Add New.
- Now put your pricing's title into First Filed as screenshot's. Then put your expecting package rate (mention there your currency sign). Now put your package details into Package Offers field . Here you can input your offer title into Offer Title. As well as you can show your icon from Icon Field. Using Add Icon and Remove Icon you can add icon here and remove the icon. Without this you can able to put button text into Button Text field. You can also able to offer ticket using Button Link option.
- At last click on Publish button.
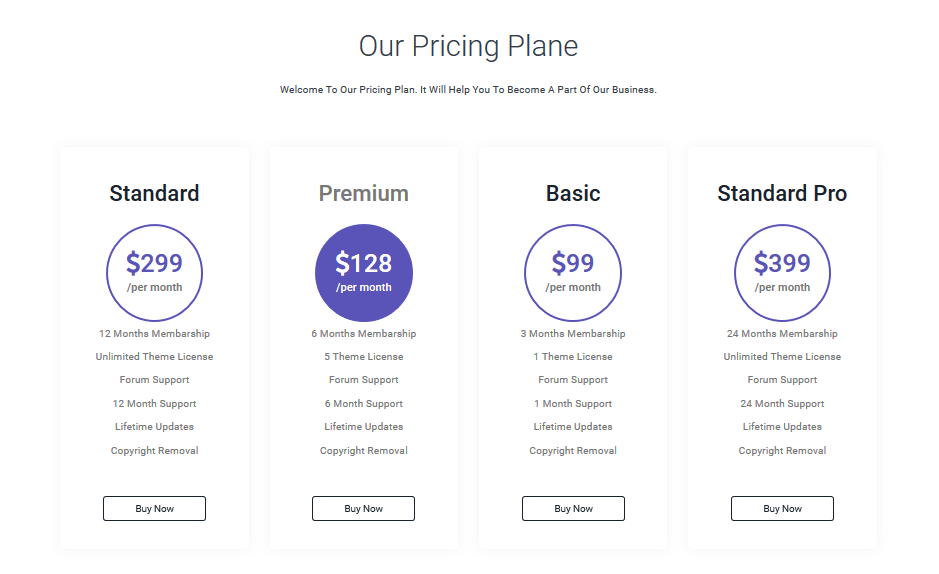
Go to any page:
Select any pricing style shortcode and fillup it like bellow
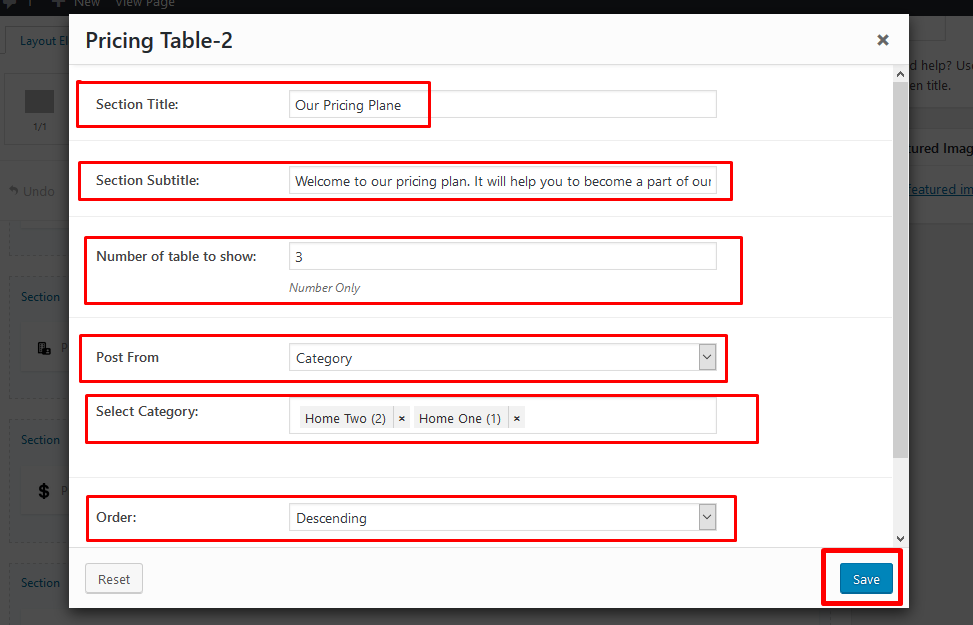
Finally you will able to see the screenshot like below:
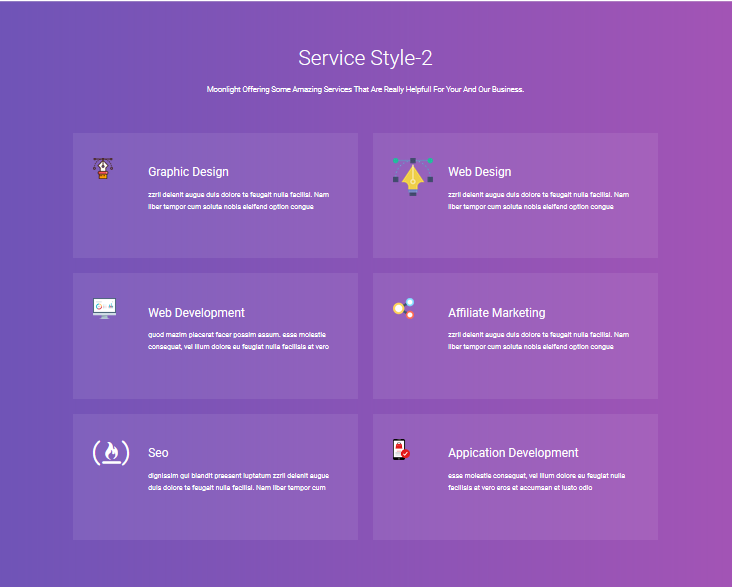
Custom Post Type Services
- At first you need to go to dashboard and select the custom post Services option.
- Add your Services details
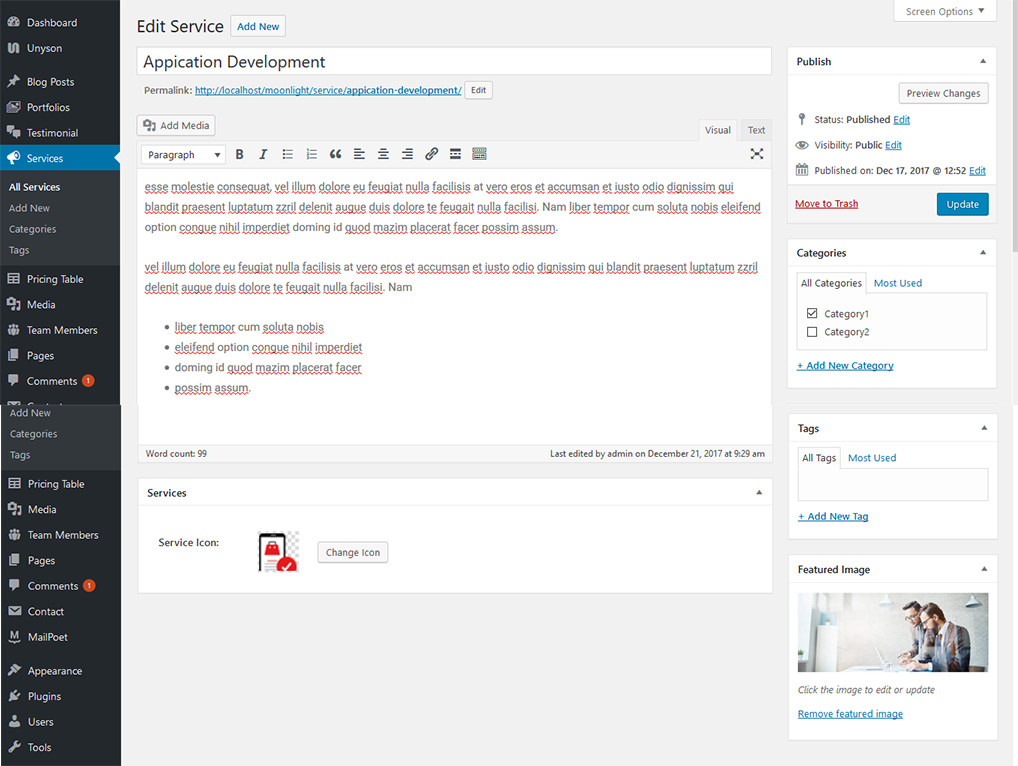
- Go to any page and select any services shortcode
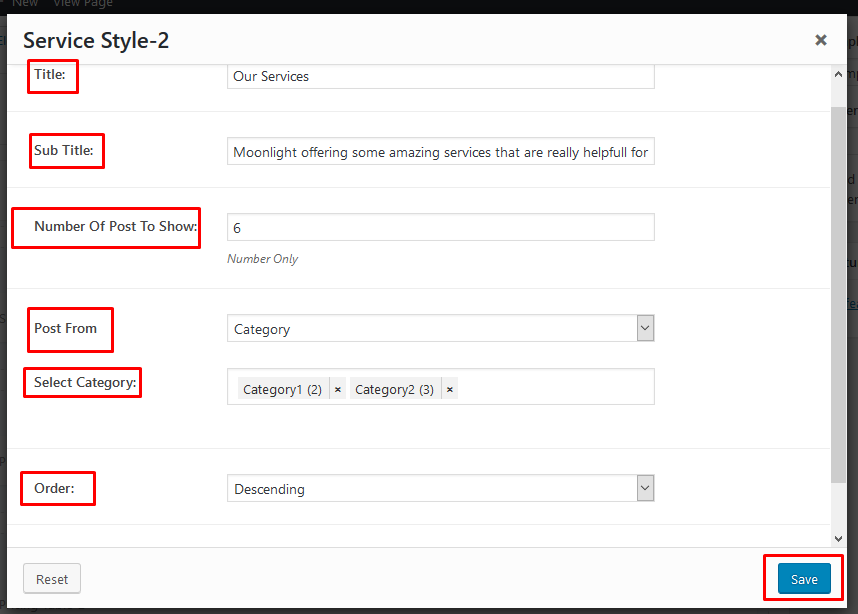
Finally you will able to see the screenshot like below:
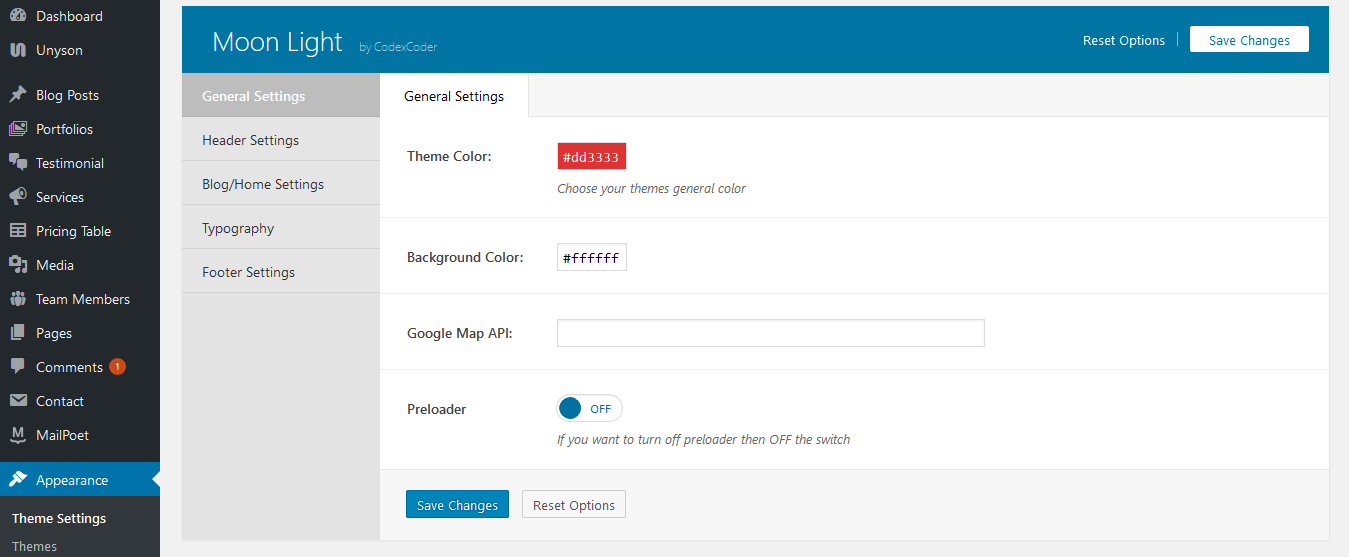
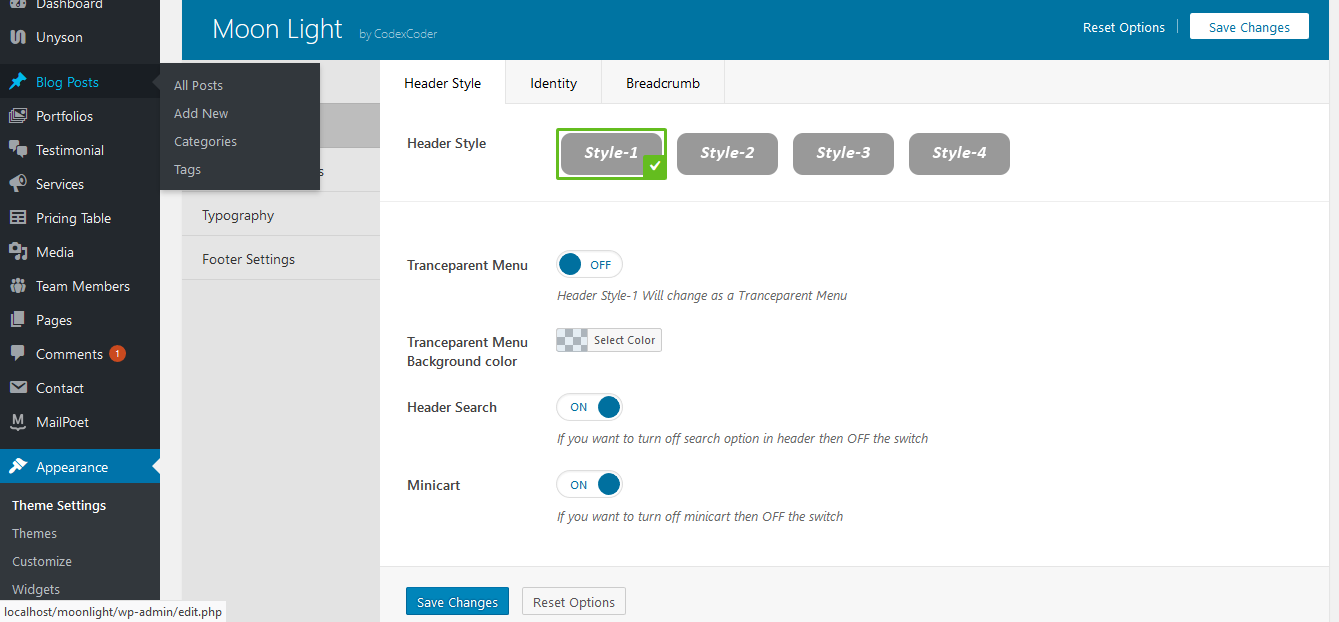
If you want to change the general options of the theme, go to your WordPress Admin Area to Appearance > Theme Settings menu. Here you have a tabbed Navigation where you can change a lot of Options of your new Theme. There have lot's of option for MoonLight Theme.
- General Settings
- Header Setting
- Blog/Home Setting
- Typography
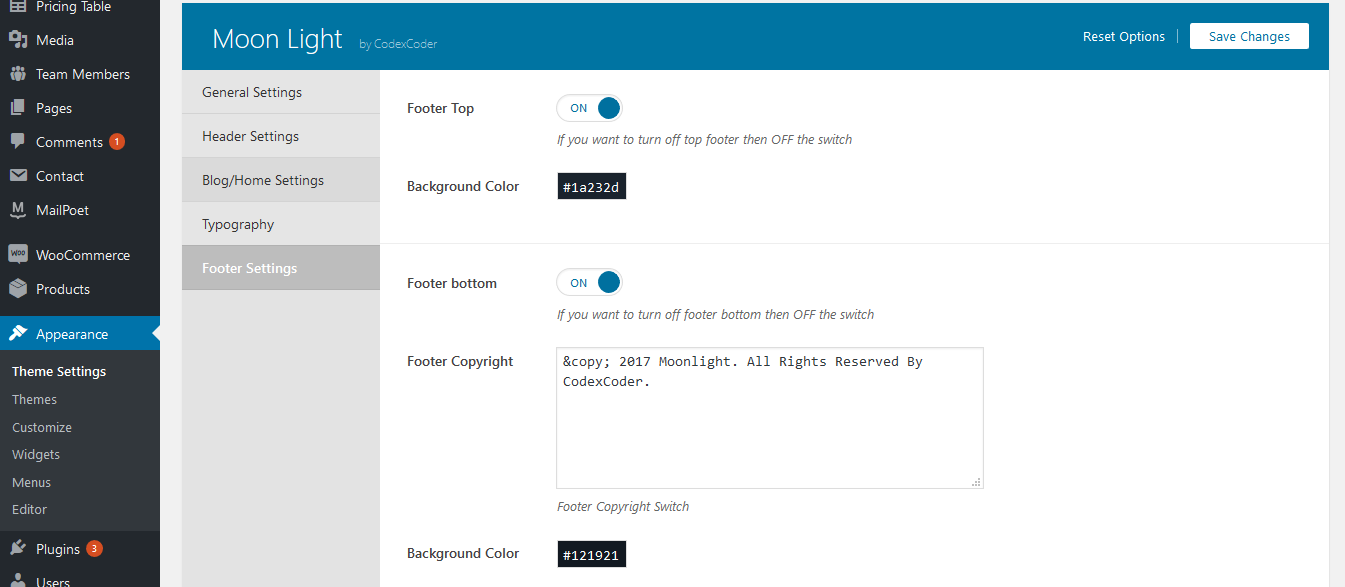
- Footer Settings
Notice: Before adjusting the different settings, you should first click on the Save Options button, to insert all default data to the database and make sure everything looks good.
- You can change Header style make this tranceparent and many more!
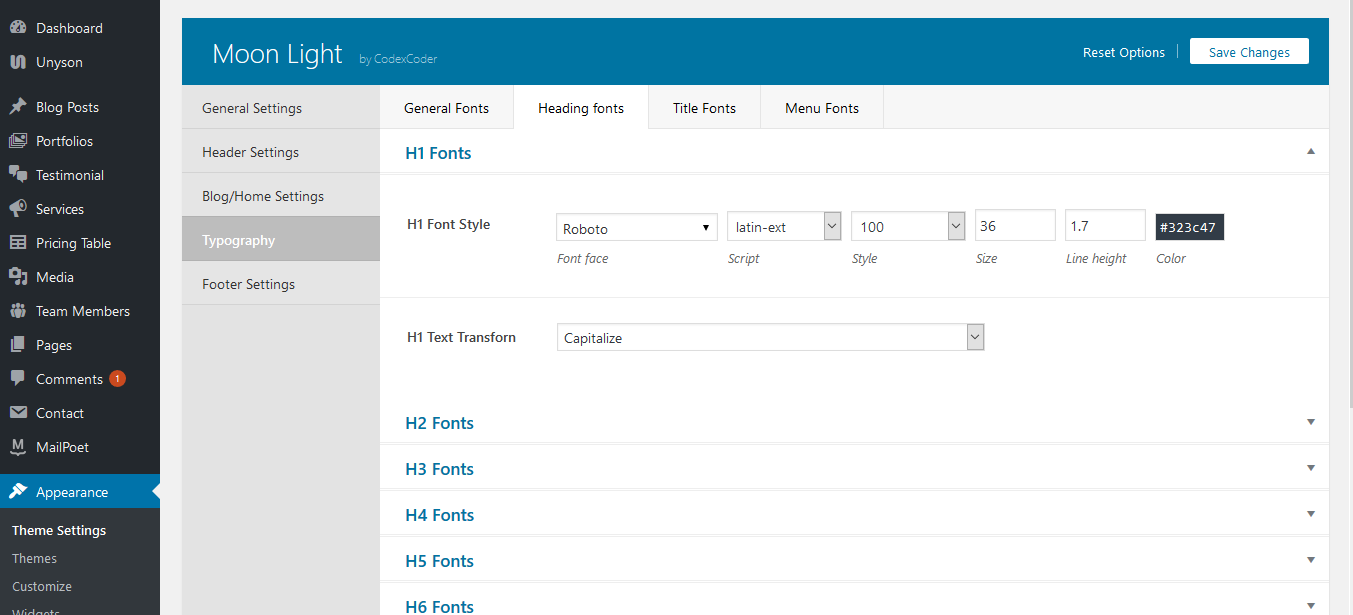
Go to Theme Option > Typography.
- Click on Typography
- Body Font Family : Use unlimited google font.
- Body Font Size : Put font size.
- Title font family : Theme all title will take this font family.
- Title font family style : Theme all title will take this font family style.
- Title text-transform : Theme all title will take this text transform.
- Title color : Theme all title will take this color.
- Menu font family : Menu will take this font family.
- Menu font weight : Menu will take this font weight.
- Menu font style : Menu will take this font style.
- Menu text-transform : Menu will take this text transform .
- Finally, click on Save button to save.
.
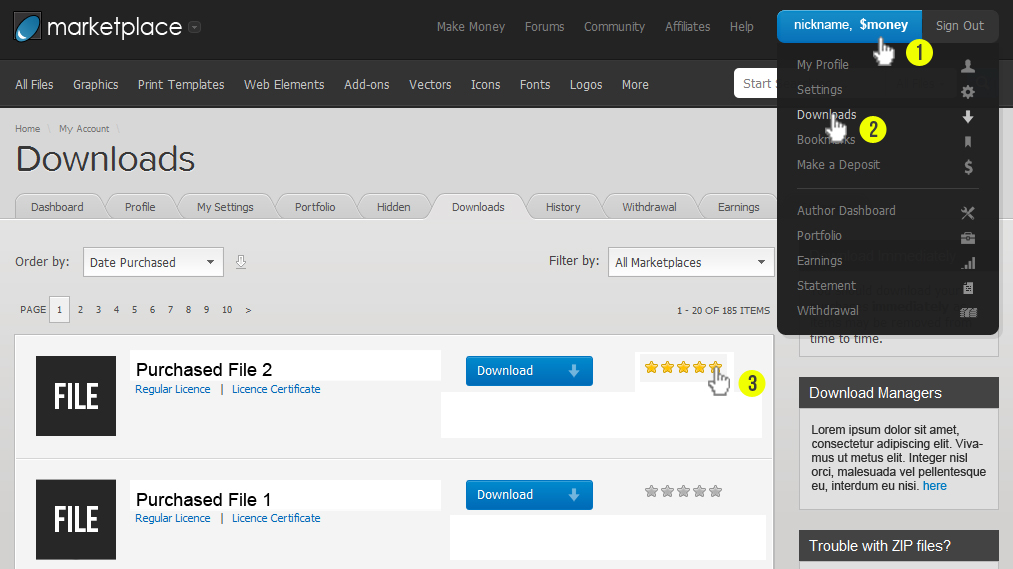
If you satisfied with our theme as well as our support Please put a five star rating from our product page. See the image below:
If you getting any problem to install or setup our event-term WordPress theme just contact with us through:
- Support Team: support@codexcoder.com